AR Transactions
Overview
-
AR Transactions
Any Accounts Receivable operation can be performed from within the Accounting Menu.
AR Transactions include:Cash Receipts
Credits
Invoice Adjustments
Miscellaneous Cash
Statement and Invoice Submissions
AR Statements
-
Key Information
Age statements and/or generate/email customers accordingly.Note for the "Generate" and "Email" options:1-Only customers having an open AR Balance will be considered2-Only customers having contacts set to receive statements will be considered
-
Running Statements
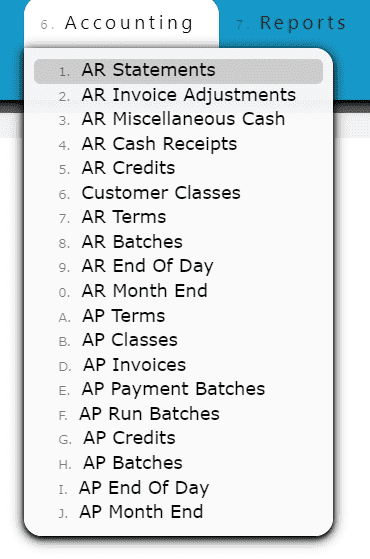
1. Go to the Accounting Menu and click on the AR Statements Sub-Menu
2. Click on the Run Statements Button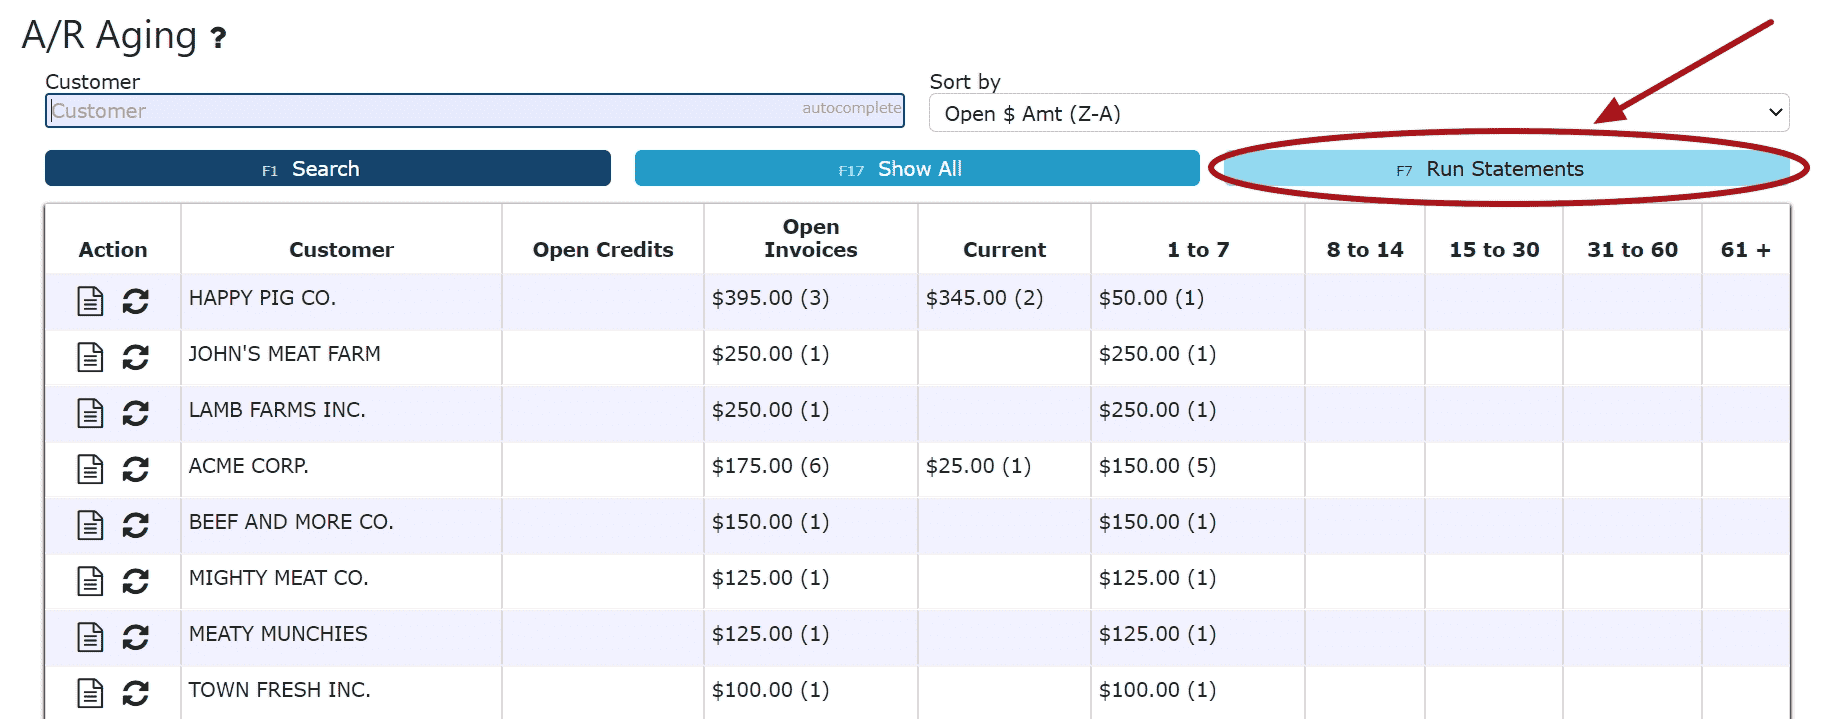
3. Enter a single customer to run statements for, otherwise leave blank to run statements for all customers
4. Select one of the 3 modes available for running statements
Mode: Age, Generate and Email: Ages the statement/AR to include updated information pertaining to what's currently owed, regenerates an updated pdf and emails the aged statement to any contact set up to receive statements by email for that customer(s)
Age and Generate Only: Ages the statement/AR to include updated information pertaining to what's currently owed, regenerates an updated pdf
Age Only: Ages the statement/AR to include updated information pertaining to what's currently owed (A PDF will not be generated with this option)
Note:
For the "Generate" and "Email" options:
- Only customers having an open AR Balance will be considered
- Only customers having contacts set to receive statements will be considered
5. Click on the Submit Button to submit the statement run
-
Automatic Statements
Have statements sent to customers automatically on one or multiple days of the week. Please Contact I.T to discuss utilizing this feature.
Example:
Send out statements to any customer with an Open AR Balance on Tuesdays and Thursdays
AR Statement Days Of The Week
(0=Mon,1=Tue, 6=Sun): 13AR Statement Yes=Past Due Only, No=All Open:Yes/No: No
AR Bulk Invoicing
-
Key Information
Send customer(s) emails containing a zip file of all current invoices that have not previously been sent.Note:1-Only customers having an open AR Balance will be considered2-Only customers having contacts set to receive statements will be considered
3-Invoices paid before bulk invoices sent, will not be sent again through bulk process
4-Invoices already sent to any contact for that customer will not be sent again through the bulk process
-
Sending Bulk Invoice Emails
1. Go to the Accounting Menu and click on the AR Statements Sub-Menu
2. Click on the Run Statements Button
3. Enter a single customer to send invoices to, otherwise leave blank to send all invoices (those not already sent) to all customers
4. Select the Bulk Invoice Emails Only option as the Mode
5. Click on the Submit Button to submit the emailing process
Note: Each submission automatically sends an email to the specified customer(s) with a zip file that contains ALL invoices that have yet to be emailed. Any invoices that have been manually sent elsewhere from within the system will not be re-sent through this submission.
-
Automatic Bulk Invoice Emails
Have bulk invoice emails sent to customers automatically on one or multiple days of the week.
Optional Feature: In addition to the zip file containing the bulk group of invoices, an AR Statement can also be included as a separate file within the same email. This statement will include all Open AR.
Each contact must be setup accordingly to utilize this feature. Please Contact I.T to discuss utilizing this feature.Example:Send out all new invoices to any customer on Tuesdays and Thursdays. In addition, send out a statement along with the invoices on Thursday.
Contact Setup:
Setup all necessary contacts to be receiving automatic bulk invoice emails and/or statements accordingly.
1. In contact maintenance, select Yes for Bulk Invoices Via Email and/or select Yes for Statement in Bulk Email (Optional)
Note: Those setup to receive bulk invoice emails will only receive those invoices that have not yet been emailed out to any contact before.
For I.T to Enable:Bulk Invoice: Automate Bulk Invoices DOTW(0=Mon,1=Tue, 6=Sun): 13Bulk Invoice Text 1: Your account invoice(s) {INV} through {DATE} are attached.
Statement:AR Statement Days Of The Week(0=Mon,1=Tue, 6=Sun): 3AR Statement Yes=Past Due Only, No=All Open:Yes/No: No
AR Invoice Adjustments
-
Key Information
Adjust the total amount of an AR invoice down.Note: Invoice adjustments cannot be used to increase the total of an invoiceExample:WriteoffInvoice Adjustment Statuses:In Progress -> the adjustment is open and is able to be editedPosted -> the adjustment has been posted and cannot be editedReady to Post -> the adjustment has been closed and is ready for posting, it cannot be edited when closed, but can be reopened if edits are necessary
Note: Posting will only successfully go through if the adjustment date equals the current cutoff date
-
Creating and Posting an AR Invoice Adjustment
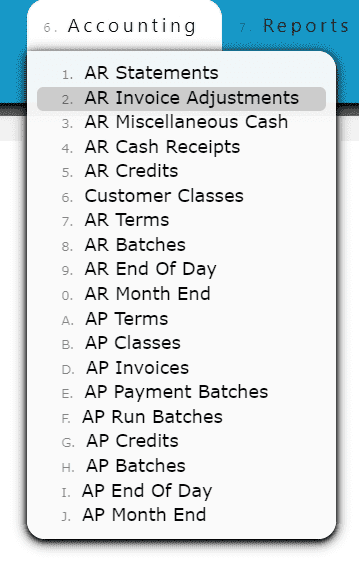
1. Go to the Accounting Menu and click on the AR Invoice Adjustment Sub-Menu
2. Click on the Add New Button
3. Enter the customer, adjustment date, type of invoice adjustment and any notes needed to label the adjustment
4. Click on the Distribute Adj Button
5. Distribute the amount of the adjustment towards any open invoice(s) listed
Add to Line (Adjusting a partial amount of an invoice):
Step 1: Click on the Add to Line Icon next to the invoice to be adjusted
Step 2: Enter the amount that the invoice must be adjusted down by (must be a negative value if adjusting an invoice, or a positive value if adjusting a credit)
Step 3: Click on the Add/Update Button
Adjusting the Entire Invoice or Credit Balance:
Step 1: Click on the Adjust Entire Invoice/Credit Balance Icon next to the invoice to be adjusted6. Click on the Back to Header Button


7. Click on the Close Adjustment Button
Note: Once closed, the adjustment is ready to post
8. Review the adjustment that is ready to post
9. Click the Post Button
Note:Once Posted, AR Invoice Adjustments cannot be edited/canceled
Adjustments will only post successfully if their date matches the end of day cutoff date
Any adjustments left open/in progress will prevent the end of day process from automatically moving forward during the night
-
Editing an AR Invoice Adjustment
1. Click on the Edit Adj Icon (Pencil) next to the AR Invoice Adjustment to be edited

If Closed:
2. Click on the Open Adj Button to re-open the adjustment. 3. Make any necessary changes to the details of the AR Invoice AdjustmentReversing a Line (Reverses the distribution made to that particular invoice):Step 1: Click on the Reverse Line Icon (X) next to the invoice to reverse the adjustment associated with it
 Deleting a Line: (Deletes the distribution made to that particular invoice):Step1: Click on the Edit Line Icon (Pencil)Step 2: Click on the Delete Line Button
 Reversing All Distributions (Deletes/Reverses all distributions made across all invoices:Step 1: Click on the Reverse All Button
 Editing a Line:Step 1: Click on the Edit Line Icon (Pencil)Step 2: Make Any necessary changes to the amount and/or description for that lineStep 3: Click on the Add/Update Button
4. Click on the Back to Header Button and make changes to the header of the adjustment as necessary

5. Click on the Close Adj Button if ready to close and post the adjustment
6. Click on the Post Button to post the adjustmentNote:Once Posted, AR Invoice Adjustments cannot be edited/canceledAdjustments will only post successfully if their date matches the end of day cutoff dateAny adjustments left open/in progress will prevent the end of day process from automatically moving forward during the night
If Open:
2. Adjust any of the header information as necessary.
3. Click on the Distribute Adj Button to make changes to the details of the adjustment 4. Make any necessary changes to the details of the AR Invoice AdjustmentReversing a Line (Reverses the distribution made to that particular invoice):Step 1: Click on the Reverse Line Icon (X) next to the invoice to reverse the adjustment associated with it
 Deleting a Line: (Deletes the distribution made to that particular invoice):Step1: Click on the Edit Line Icon (Pencil)Step 2: Click on the Delete Line Button
 Reversing All Distributions (Deletes/Reverses all distributions made across all invoices:Step 1: Click on the Reverse All Button
 Editing a Line:Step 1: Click on the Edit Line Icon (Pencil)Step 2: Make Any necessary changes to the amount and/or description for that lineStep 3: Click on the Add/Update Button
 5. Click on the Back to Header Button
6. Click on the Close Adj Button if ready to close and post the adjustment
7. Click on the Post Button to post the adjustmentNote:Once Posted, AR Invoice Adjustments cannot be edited/canceledAdjustments will only post successfully if their date matches the end of day cutoff dateAny adjustments left open/in progress will prevent the end of day process from automatically moving forward during the night
-
Deleting an AR Invoice Adjustment
1. Click on the Edit Adj Icon (Pencil) next to the AR Invoice Adjustment to be deleted

If Closed:
2. Click on the Open Button to re-open the AR Invoice Adjustment
3. Click on the Back to Header Button to return to the header of the adjustment
4. Click on the Delete Adj Button, then click Ok on the pop up prompt
Note:Once deleted, an AR Invoice Adjustment is permanently removed and can no longer be retrieved
If Open:
2. Click on the Delete Adj Button, then click Ok on the pop up prompt
Note:Once deleted, an AR Invoice Adjustment is permanently removed and can no longer be retrieved
-
Troubleshooting Batch Errors
1. Click on the Batches Button

2. Remove the dates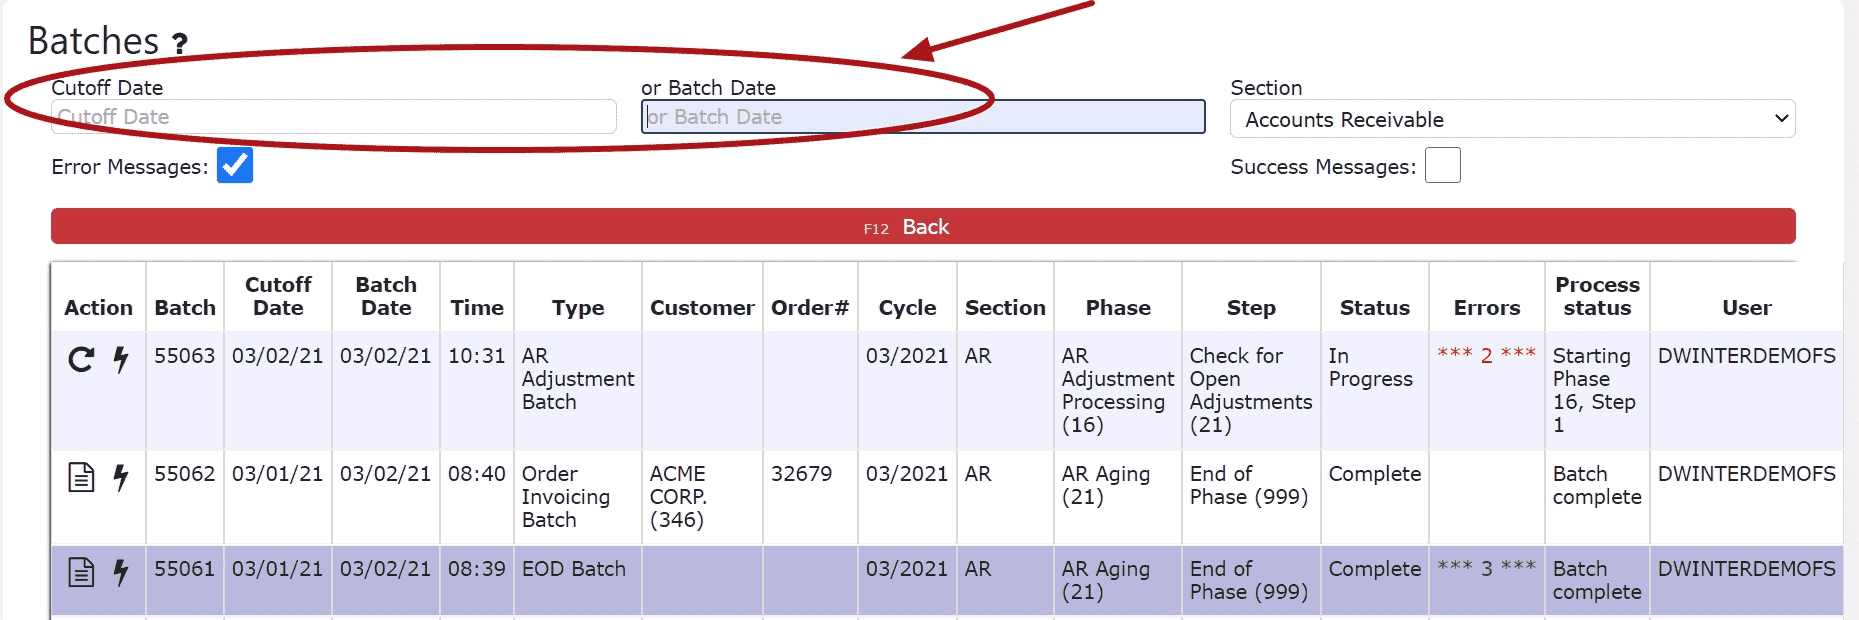
3. Locate the error batch that contains errors in red and a Re-Start This Batch Icon (Circle Arrow)
Note: Any AR Batch Error that has not been resolved will prevent any transactions from posting successfully (including AR Invoice Adjustments)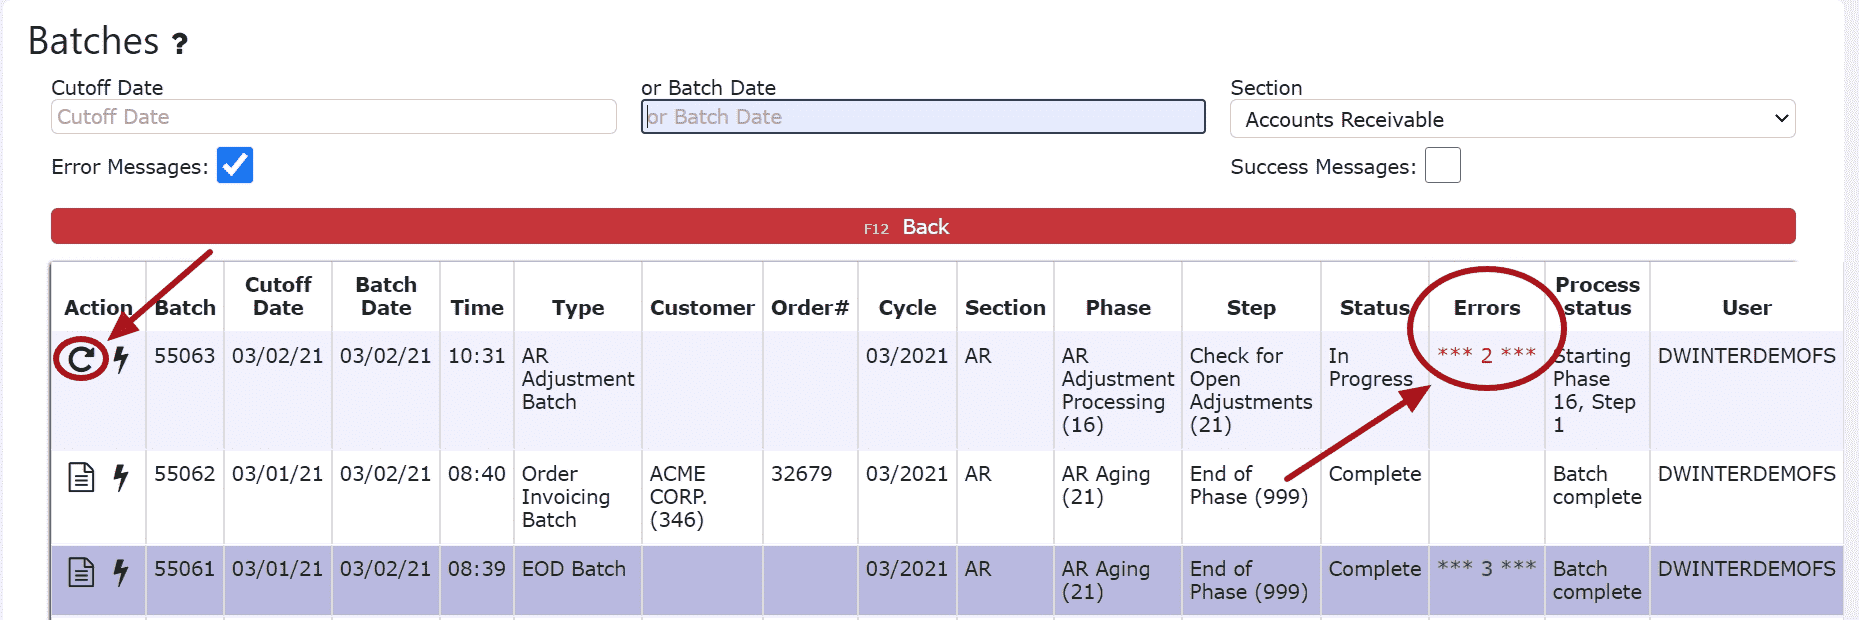 4. Click on the Batch Messages Icon (Lightning Bolt) next to the Error Batch in question
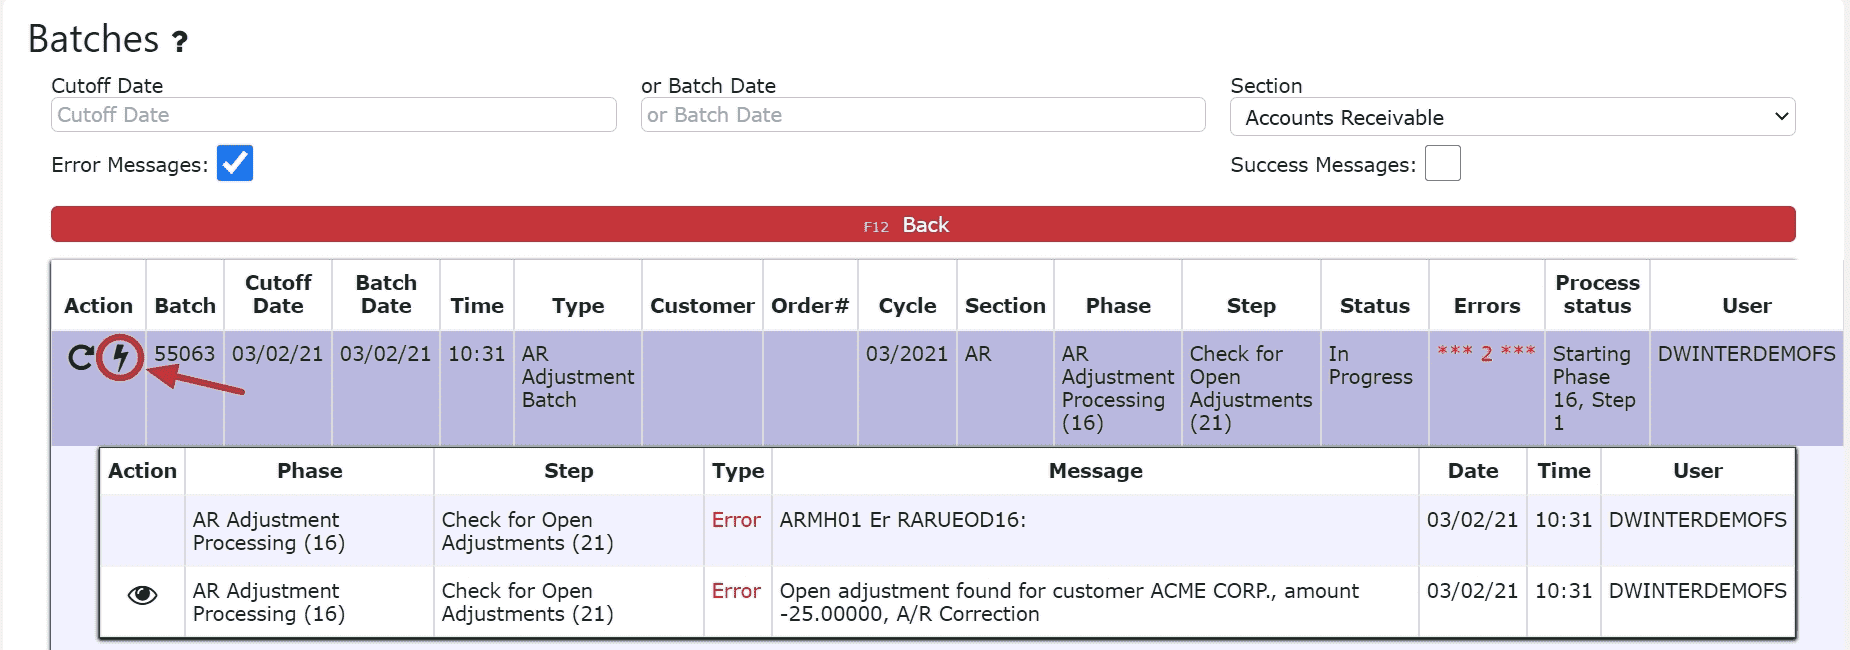 5. Review the errors preventing the AR Invoice Adjustment from posting
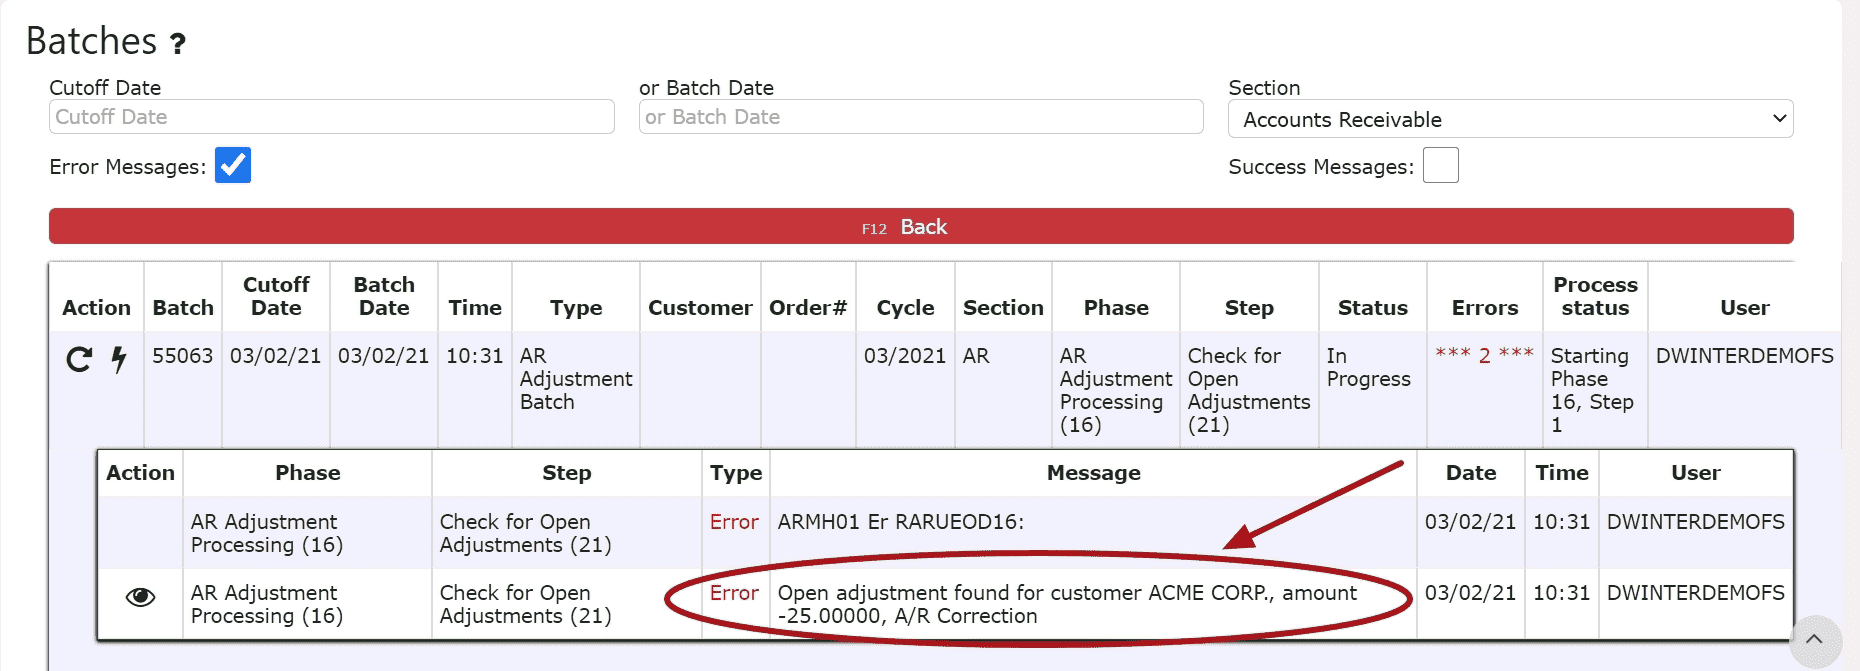 6. Resolve each error listed in the batch. Click on the eyeball next to each error to be automatically redirected to the order/transaction in question.For Open Orders:Either invoice, cancel or forward date the orderFor Open/In Progress Transactions (AR Credits, AR Misc. Cash Entries, AR Cash Receipts, AR Adjustments):Either close and post, cancel or forward date the transaction
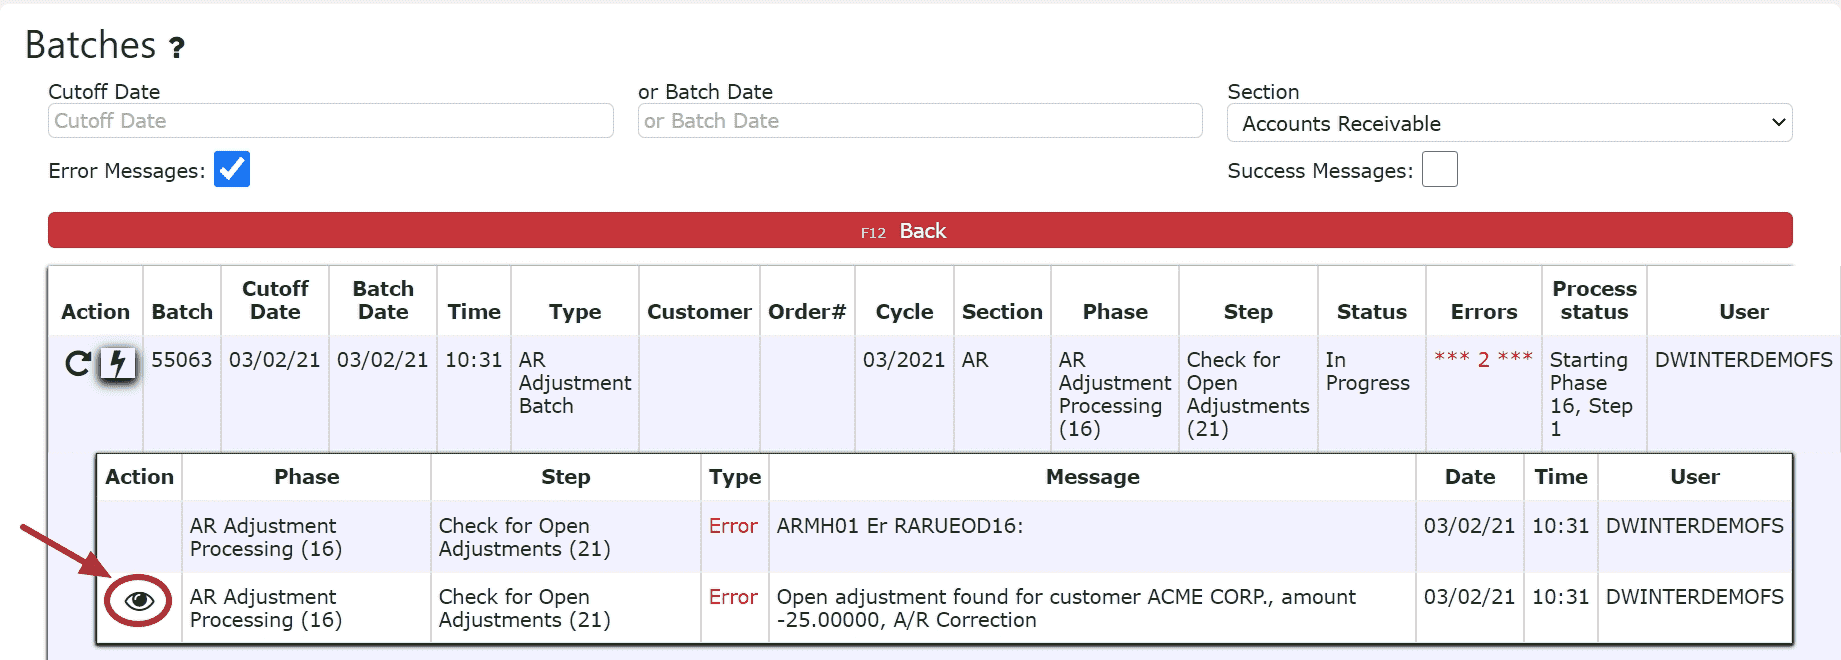
 7. After all errors have been resolved, go back to AR Batches and click on the Re-Start This Batch Icon to re-start the error batch. The AR Invoice Adjustment will automatically post, the Re-Start this Batch icon will dissapear and the red errors will turn green, if the batch is successful.

AR Miscellaneous Cash
-
Key Information
Create and maintain any miscellaneous cash that has been received.Examples:InvestmentMiscellaneous DepositAR Miscellaneous Cash Statuses:In Progress -> the misc. cash entry is open and is able to be editedPosted -> the misc. cash entry has been posted and cannot be editedReady to Post -> the cash entry has been closed and is ready for posting, it cannot be edited when closed, but can be reopened if edits are necessary
Note: Posting will only successfully go through if the misc. cash record date equals the current cutoff date
-
Creating and Posting an AR Miscellaneous Cash Entry
1. Go to the Accounting Menu and click on the AR Miscellaneous Cash Sub-Menu
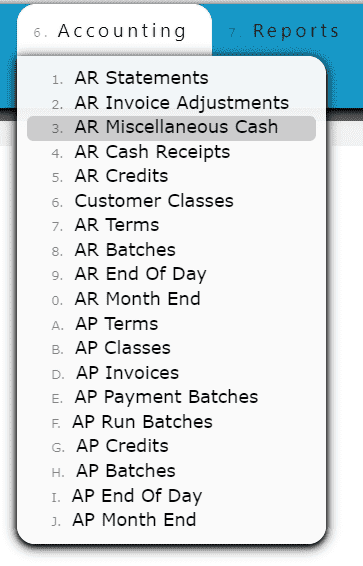 2. Click on the Add New Button
 3. Select the bank, and enter the customer, cash credit date, type of AR Misc. Cash deposit and any notes needed to label the entry. Click on the Save & Exit Button to save and close the entry.
 4. Review the Misc. Cash Entry that is ready to post
 5. Click the Post ButtonNote:Once Posted, AR Miscellaneous Cash Entries cannot be edited/canceledMiscellaneous Cash Entries will only post successfully if their date matches the end of day cutoff dateAny Miscellaneous Cash Entries left open/in progress will prevent the end of day process from automatically moving forward during the night
-
Editing an AR Miscellaneous Cash Entry
1. Click on the Edit Icon (Pencil) next to the AR Misc. Cash Entry to be edited
 If Closed:2. Click on the Open Button to re-open the Misc. Cash Entry. Adjust any of the header information as necessary.
 3. Click on the Close Button if ready to close and post the Misc. Cash Entry
 4. Click on the Post Button to post the Misc. Cash EntryNote:Once Posted, AR Misc. Cash Entries cannot be edited/canceledMisc. Cash Entries will only post successfully if their date matches the end of day cutoff dateAny Misc. Cash Entries left open/in progress will prevent the end of day process from automatically moving forward during the night
 If Open:2. Adjust any of the header information as necessary.
 3. Click on the Close Button if ready to close and post the Misc. Cash Entry
 4. Click on the Post Button to post the entryNote:Once Posted, AR Misc. Cash Entries cannot be edited/canceled
Misc. Cash Entries will only post successfully if their date matches the end of day cutoff dateAny Misc. Cash Entries left open/in progress will prevent the end of day process from automatically moving forward during the night
-
Deleting an AR Miscellaneous Cash Entry
1. Click on the Edit Icon (Pencil) next to the AR Misc. Cash Entry to be deleted
 If Closed:2. Click on the Open Button to re-open the AR Misc. Cash Entry
 3. Click on the Delete Button, then click Ok on the pop up promptNote:Once deleted, an AR Misc. Cash Entry is permanently removed and can no longer be retrieved
 If Open:2. Click on the Delete Button, then click Ok on the pop up promptNote:Once deleted, an AR Misc. Cash Entry is permanently removed and can no longer be retrieved
-
Troubleshooting Batch Errors
1. Click on the Batches Button
 2. Remove the dates
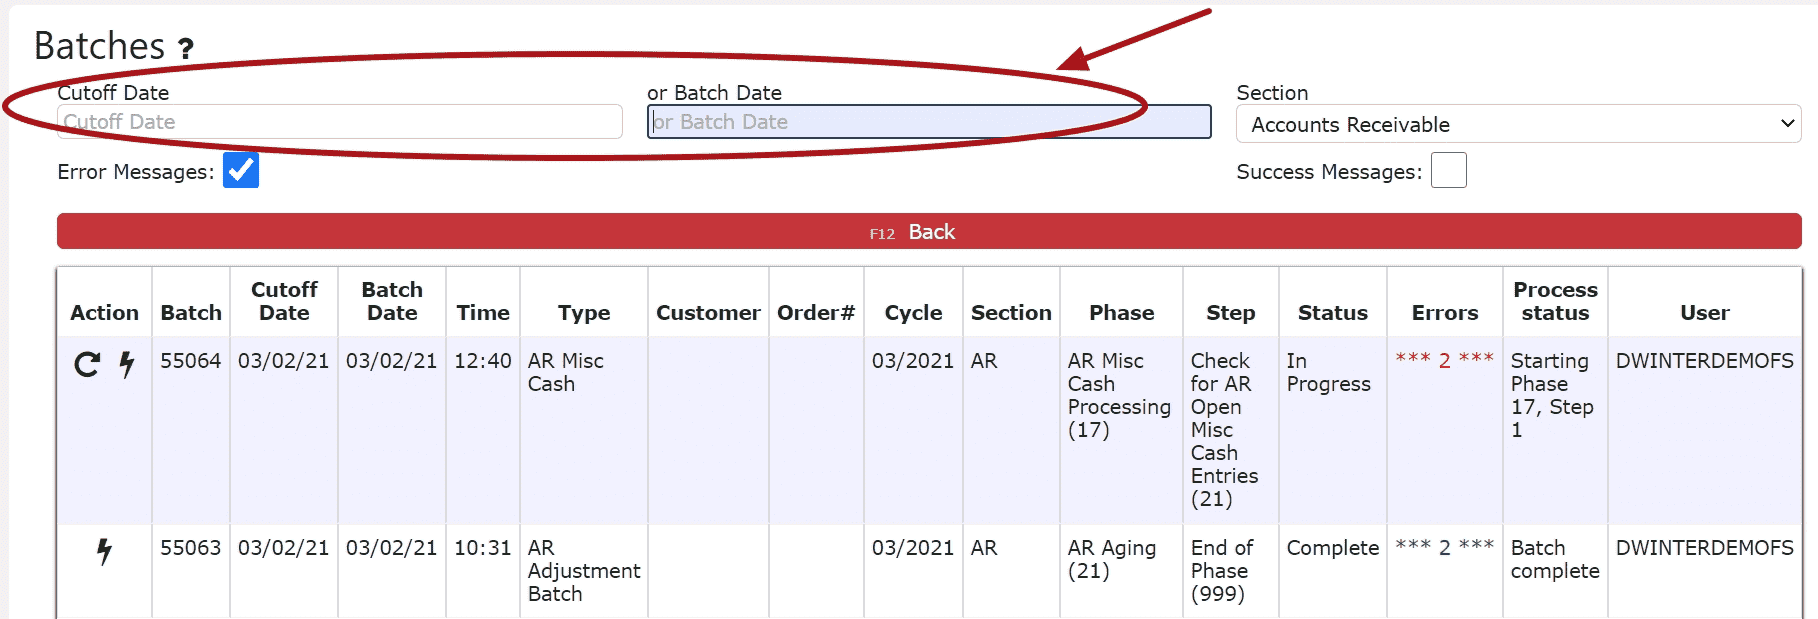 3. Locate the error batch that contains errors in red and a Re-Start This Batch Icon (Circle Arrow)Note:Any AR Batch Error that has not been resolved will prevent any transactions from posting successfully (including AR Misc. Cash Entries)
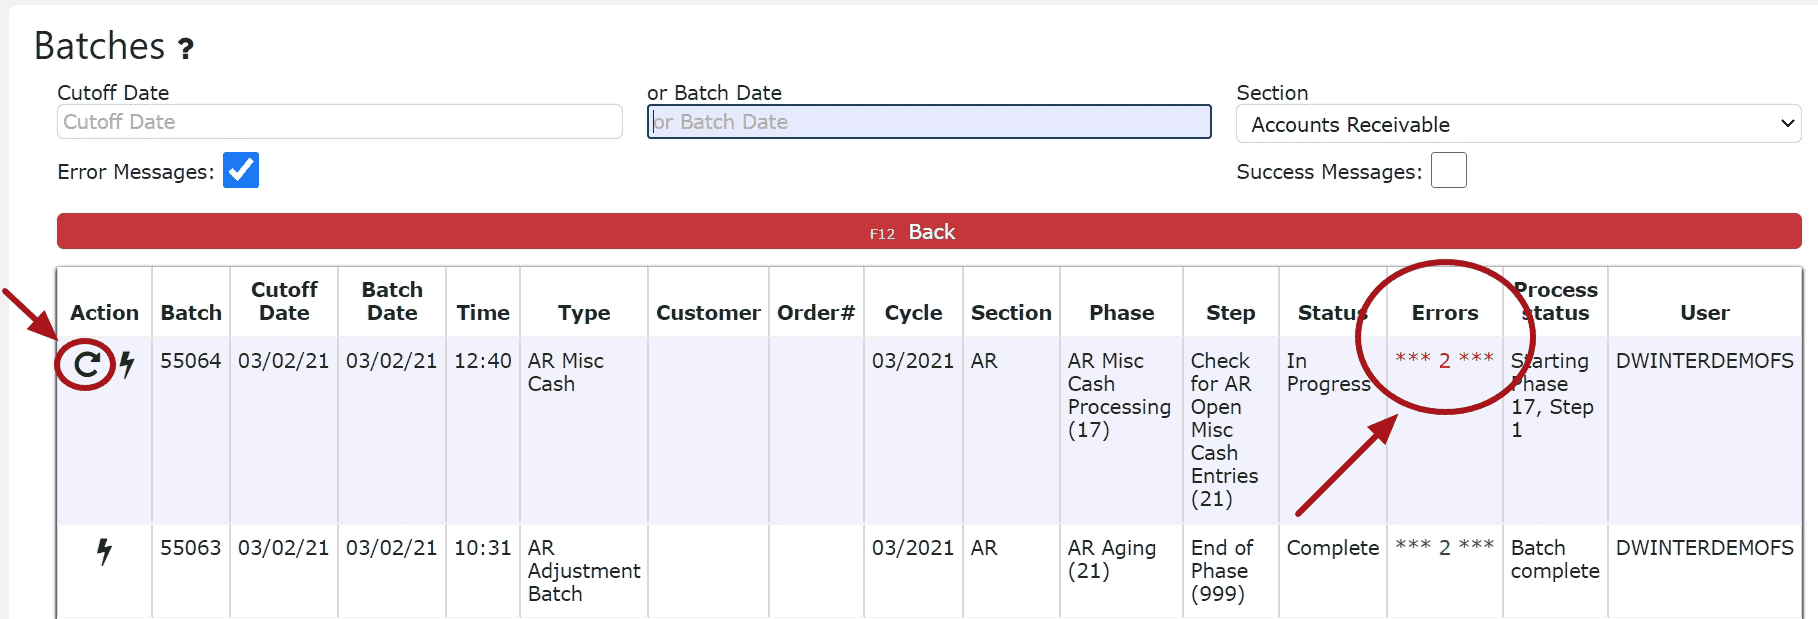 4. Click on the Batch Messages Icon (Lightning Bolt) next to the Error Batch in question
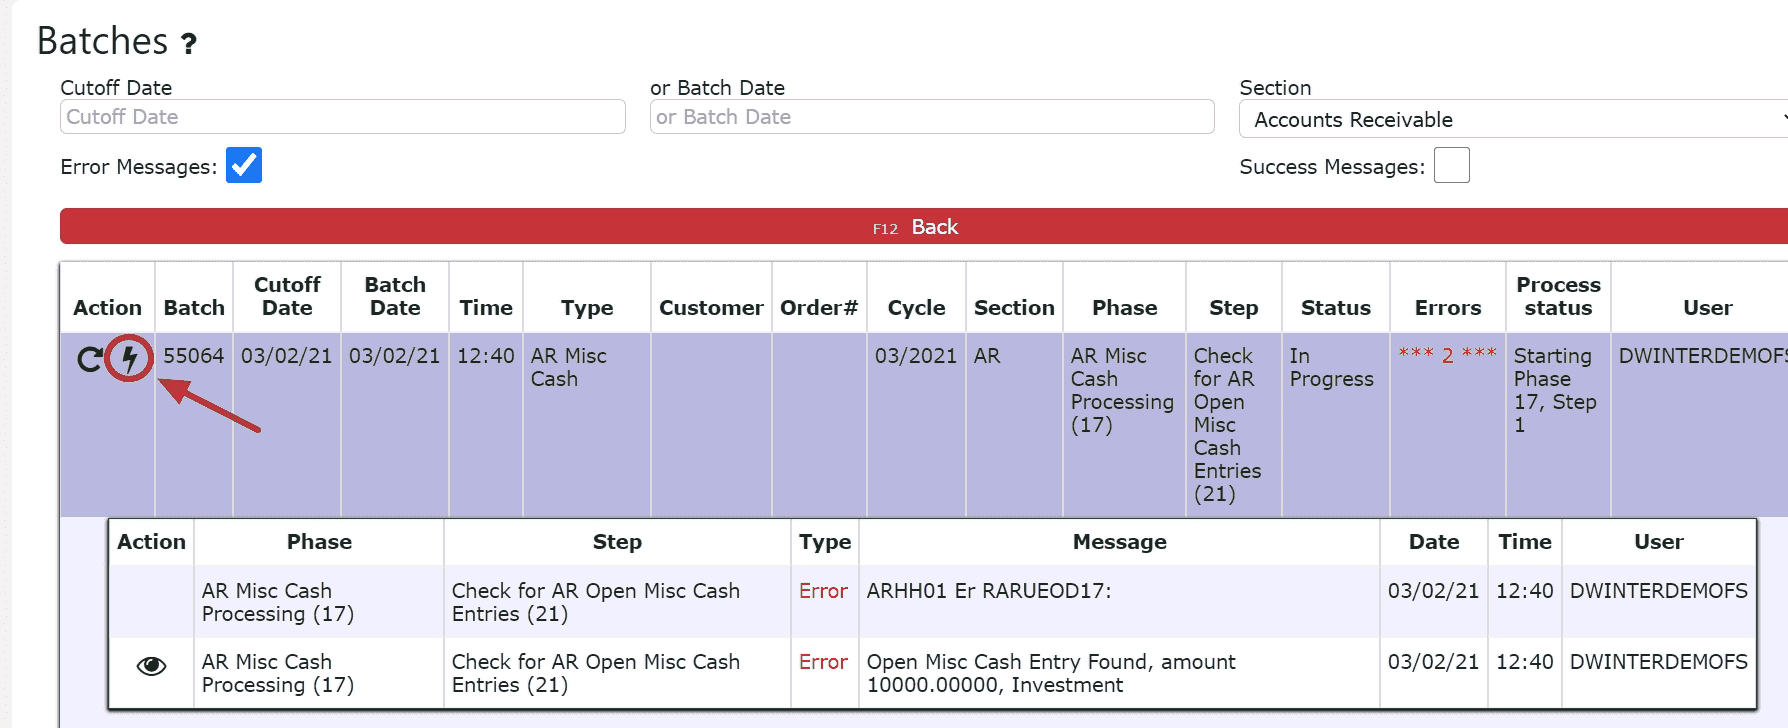 5. Review the errors preventing the AR Misc. Cash Entry from posting
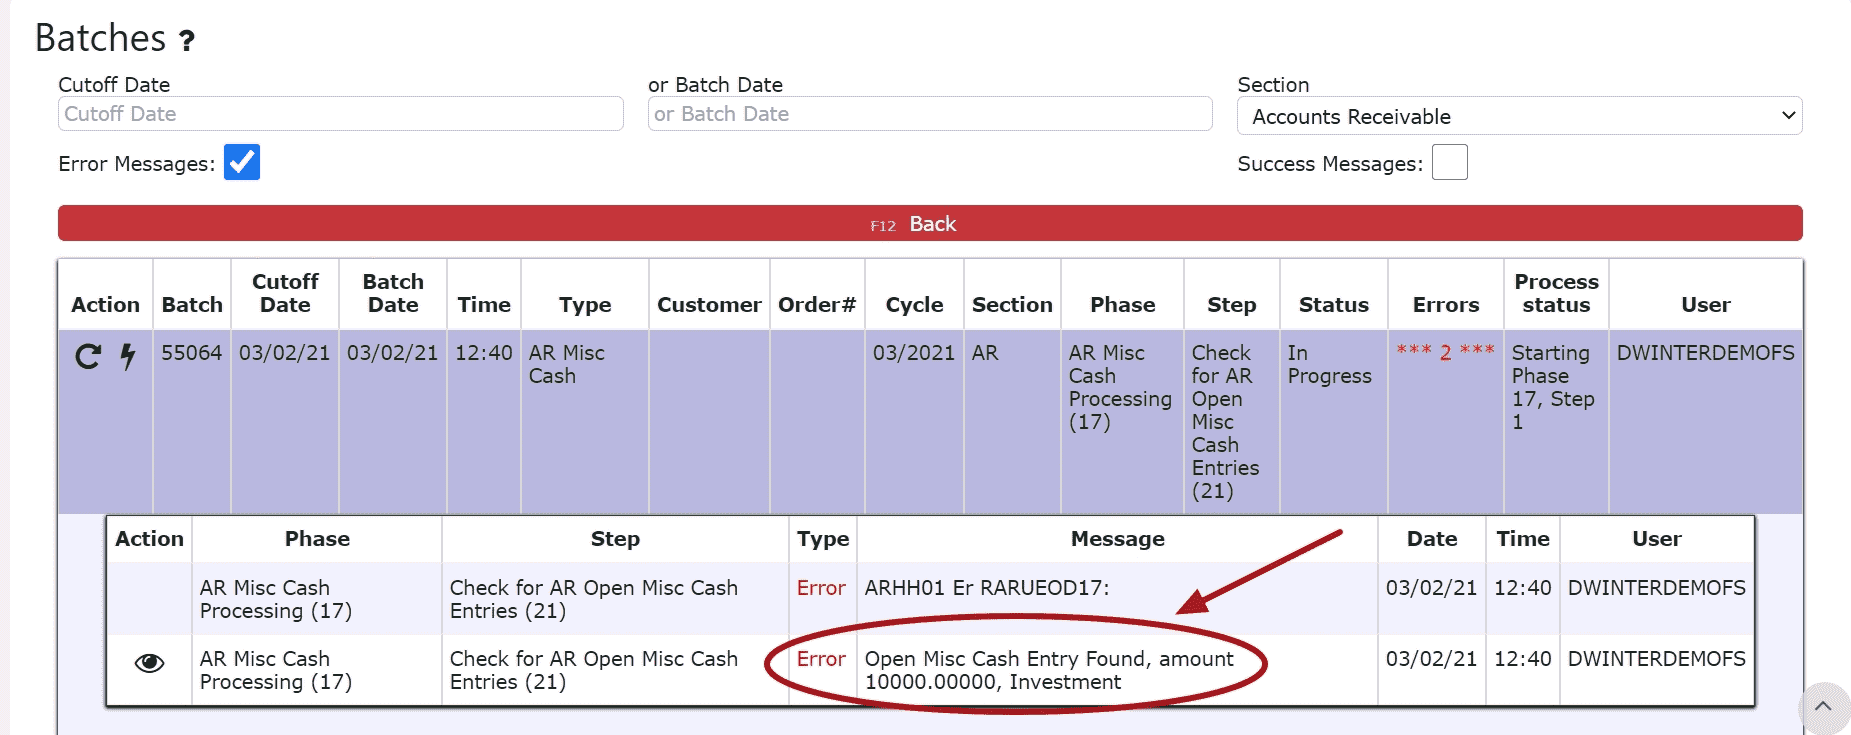 6. Resolve each error listed in the batch. Click on the eyeball next to each error to be automatically redirected to the order/transaction in question.For Open Orders:Either invoice, cancel or forward date the orderFor Open/In Progress Transactions (AR Credits, AR Misc. Cash Entries, AR Cash Receipts, AR Adjustments):Either close and post, cancel or forward date the transaction
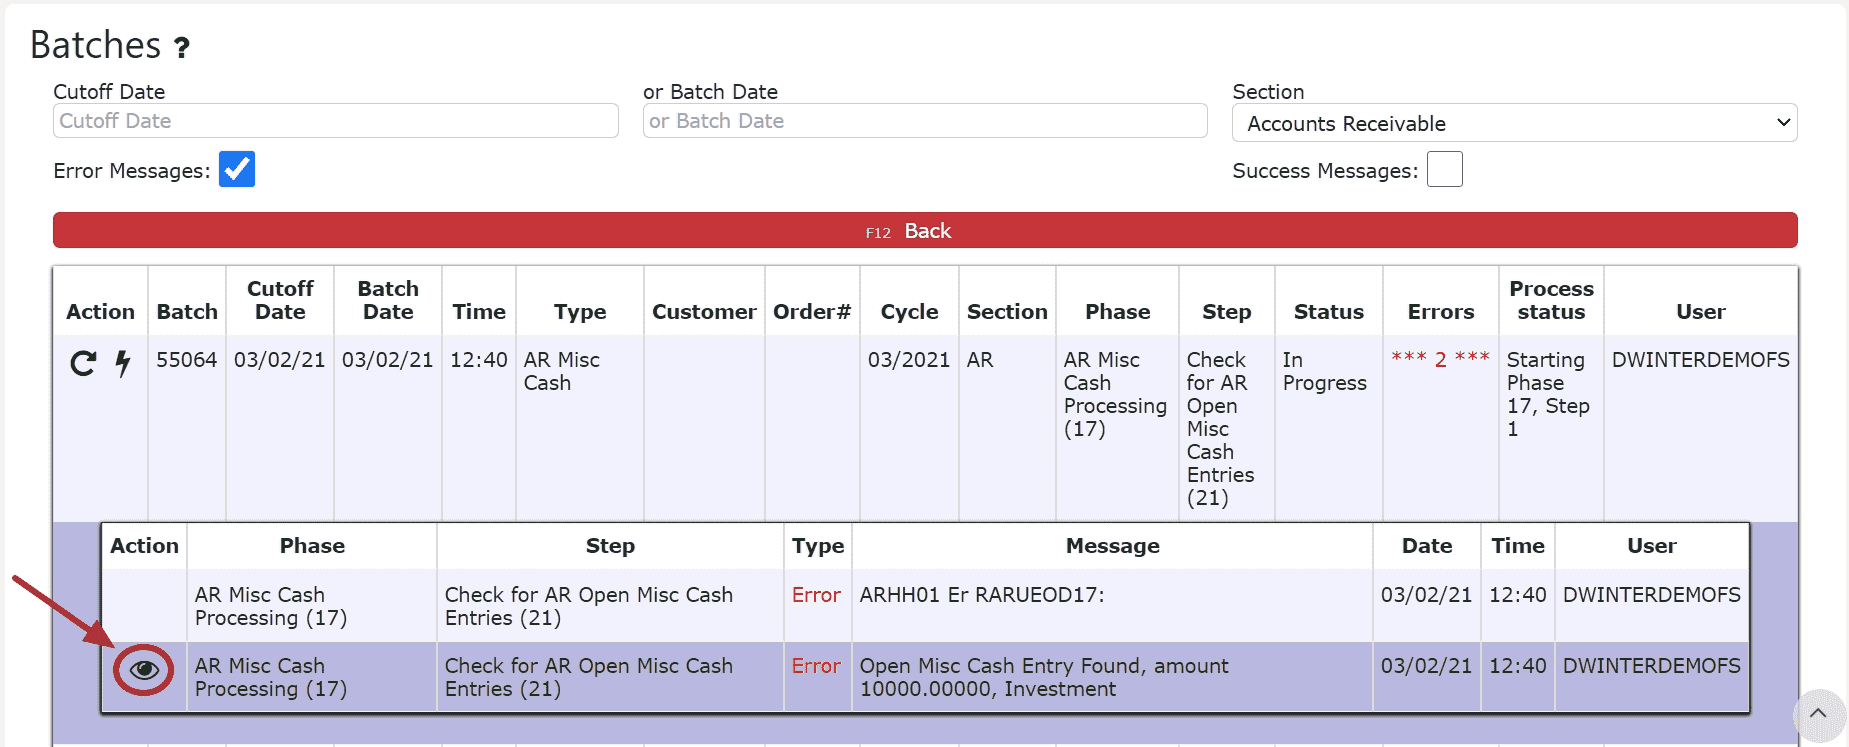
 7. After all errors have been resolved, go back to AR Batches and click on the Re-Start This Batch Icon to re-start the error batch. The AR Misc. Cash Entry will automatically post, the Re-Start this Batch icon will dissapear and the red errors will turn green, if the batch is successful.

AR Cash Receipts
-
Key Information
Apply payments received and on account credits towards open invoices within the system.Examples:ChecksCash
LiveCards: Process a credit card payment in real-timeExternally Processed Credit Cards: Use an external credit card processor to process the actual credit cardExternally Processed ACH/Transfer/Wire: Use an external processor to proccess the actual ACH/Transfer/Wire transactionAR Cash Receipt Statuses:In Progress -> the cash receipt is open and is able to be editedPosted -> the cash receipt has been posted and cannot be editedReady to Post -> the cash receipt has been closed and is ready for posting, it cannot be edited when closed, but can be reopened if edits are necessary
Note: Posting will only successfully go through if the cash receipt date equals the current cutoff date
-
Creating and Posting an AR Cash Receipt
1. Go to the Accounting Menu and click on the AR Cash Receipts Sub-Menu
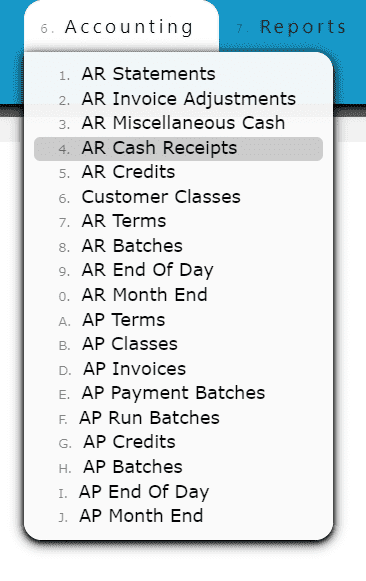
2. Click on the Add New Button
3. Enter the customer who made the payment, select a payment date, payment type, and total payment amount. Enter a check # or reference # if applicable.
Note:Reference numbers are required for Credit Card and ACH/Transfer/Wire Payments. Once a Credit Card or ACH/Transfer/Wire Payment has been completed from an outside source, the reference number generated from that transaction must be included as part of the corresponding AR Cash Receipt.
Check numbers are required for all payments made by check
4. Click on the Distribute $ Button
5. Distribute the amount of the payment towards any open invoice(s) listedAdd to Line (paying a partial amount of the invoice):
Step 1: Click on the Add to Line Icon next to the invoice to be paid
Step 2: Enter the amount of the invoice to pay
Step 3: Click on the Add/Update Button
Auto Pay Remaining Balance (applies the entire remaining payment amount to the invoice):
Step 1: Click on the Auto Pay Remaining Balance Icon

Distribute All (distributes the entire amount of the payment to the invoices starting from the top of the list, up until the payment amount runs out):
Step 1: Click on the Distribute All Button
6. Click on the Back to Header Button

7. Click on the Close Payment Button
Note: Once closed, the cash receipt is ready to post
8. Review the Cash Receipt that is ready to post

9. Click the Post Button
Note: Cash Receipts will only post successfully if their date matches the end of day cutoff date. Any Cash Receipts left open/in progress will prevent the end of day process from automatically moving forward during the night
-
Using LiveCards
Inspired LiveCard Transactions
Credit cards can be used to submit a live payment for a cash receipt. As opposed to externally processed credit card transactions that are processed elsewhere outside of the Inspired system, these "Live" credit card transactions will be processed immediately upon posting, and eliminate the need for other external credit card processors.
Your applicable merchant fees will apply accordingly.
Note: Inspired Technology Systems does not save nor store any credit card information on our servers.
Secure tokens are used instead. Account tokenization involves completely removing sensitive data and replacing it with a randomly generated value called a token.
Setting up Inspired LiveCards:
LiveCards(credit cards) can be maintained for each customer, and are assigned through the customer master list, or directly from within a cash receipt
1. Go to the Sales Menu and click on the Customers Sub-Menu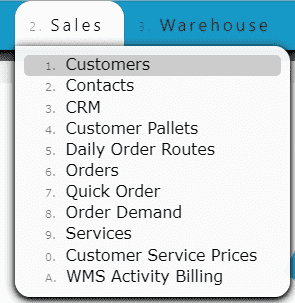
2. Click on the LiveCards Icon to view and maintain that customer's list of credit cards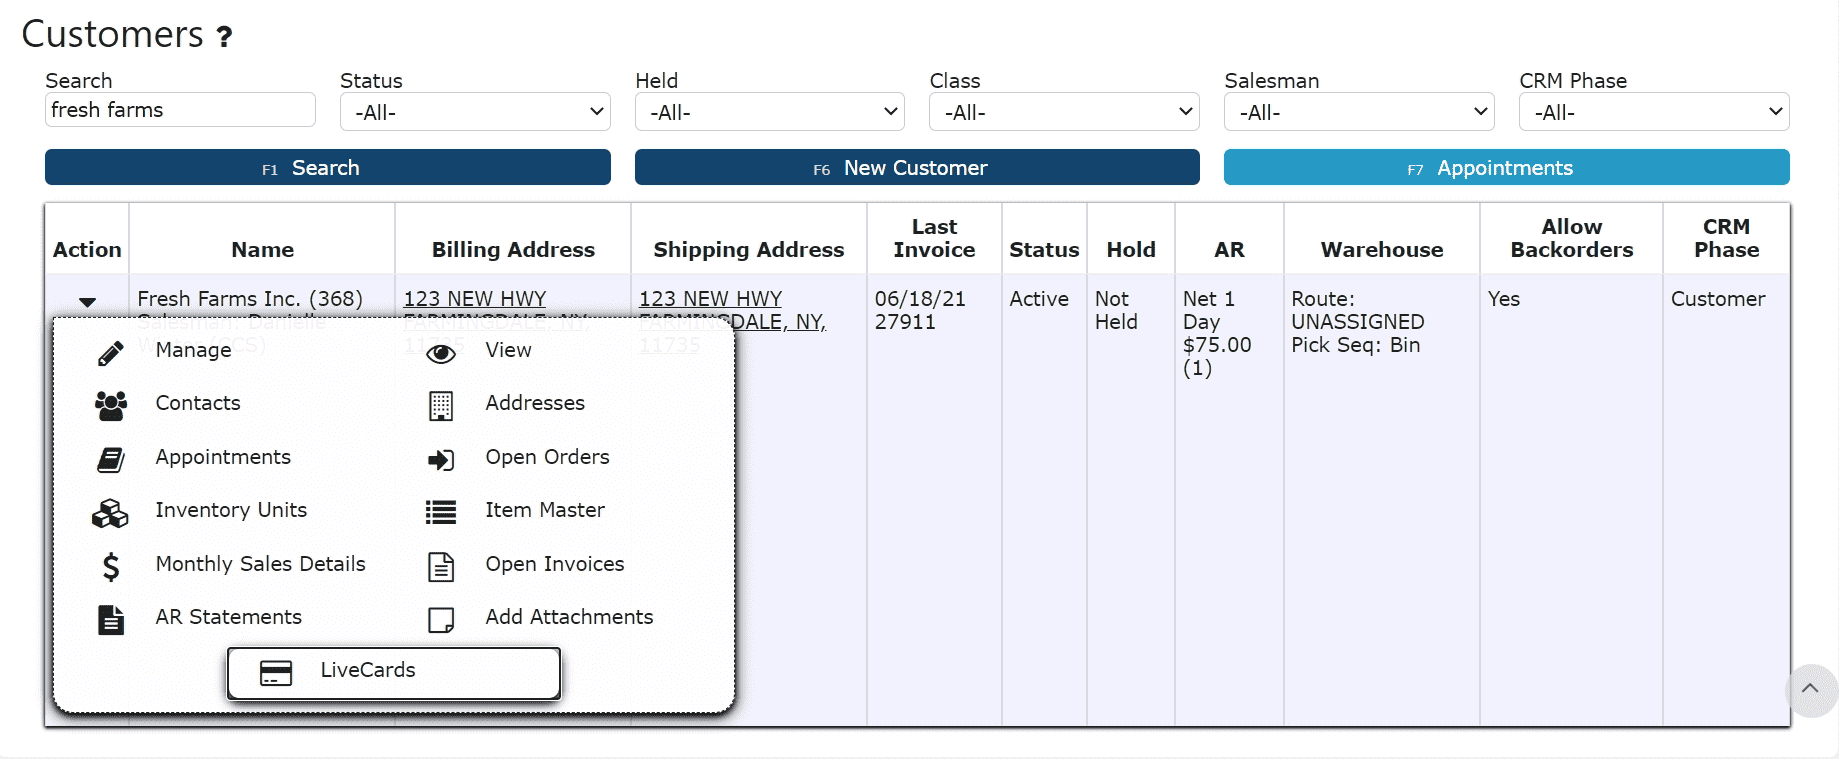
3. Create and maintain customers' LiveCards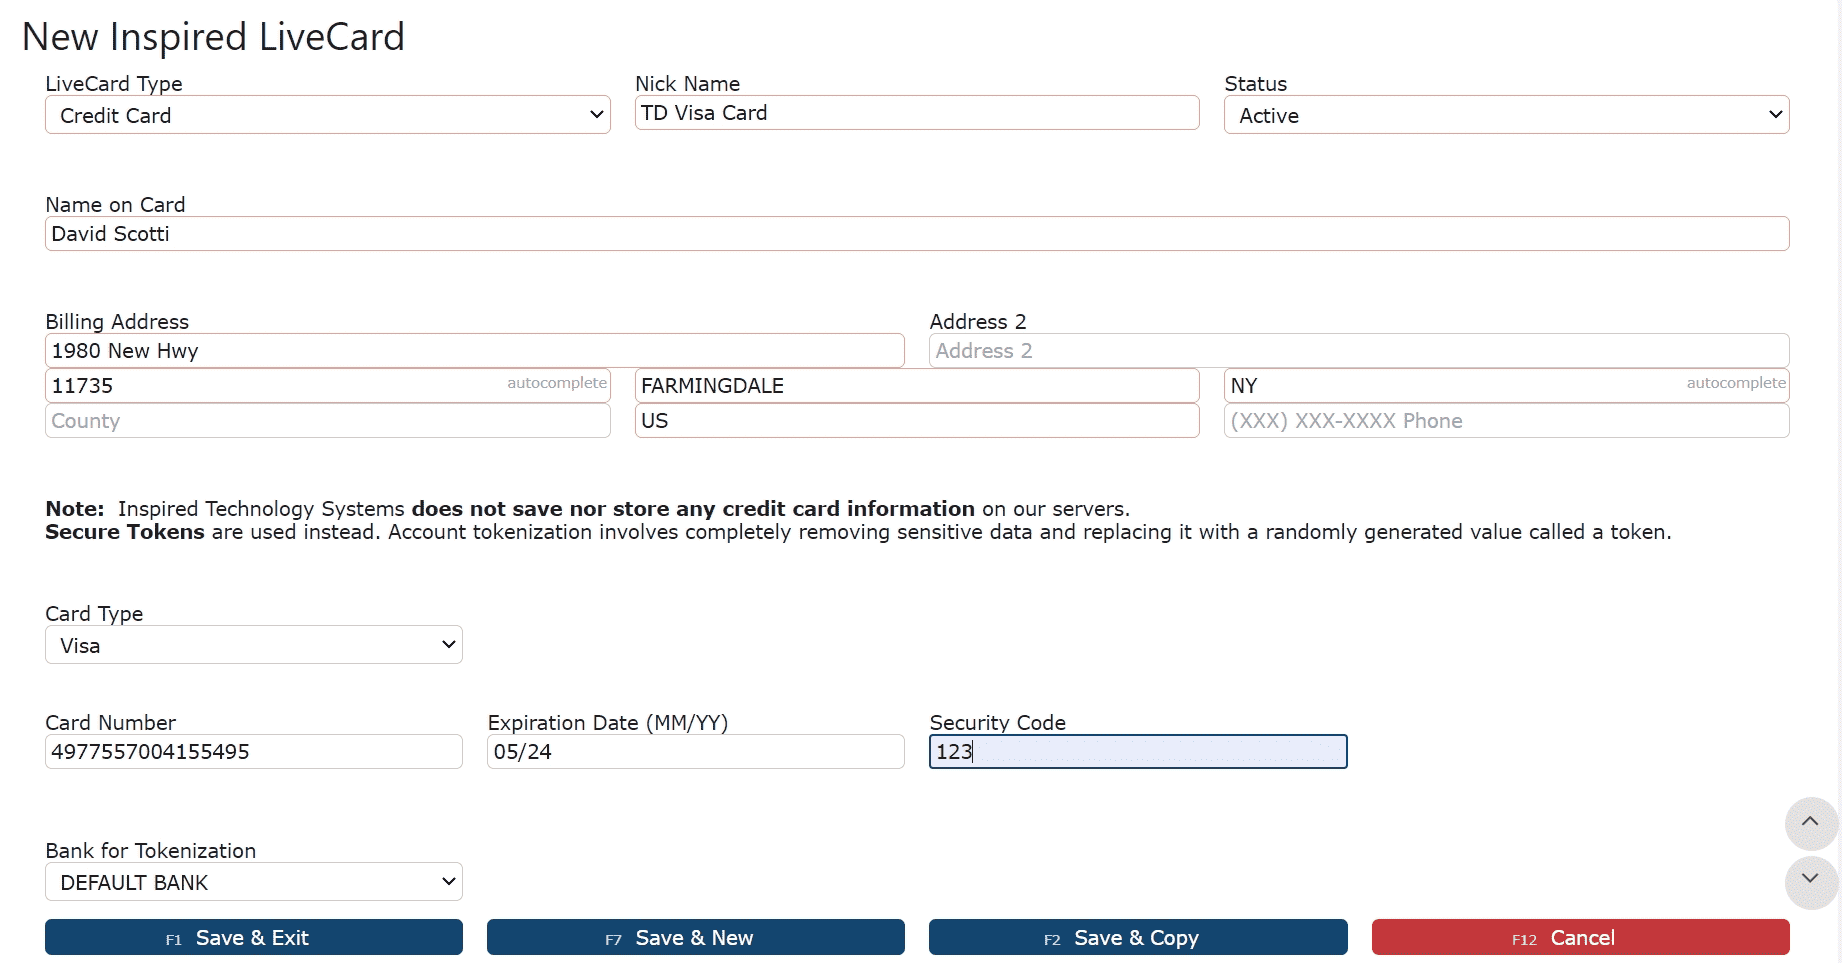

Note: LiveCards must be tokenized successfully in order to use.
4. View transaction history

Using a LiveCard in a Cash Receipt:
1. Select the Live Card option as the payment type, and the LiveCard to use for the transaction
Note: Add/edit LiveCards using the Manage LiveCards Button
2. Click on the Distribute Button to start distributing the payment
3. Choose the Pay All Button or click on the Dollar Icon next to each invoice to pay
4. Click the Back to Header Button and proceed to close and post the Cash Receipt


-
Applying an On Account Credit through an AR Cash Receipt
1. Go to the Accounting Menu and click on the AR Cash Receipts Sub-Menu
 2. Click on the Add New Button
3. Enter the customer, select a payment date, payment type and enter a total payment amount
For On Account Credits Only:
Select Apply Credit as the payment type
Enter $0 for the total payment amount
For On Account Credits + Additional Payments:
Select the payment type for the additional payment(s) to be applied
Enter the amount for the total amount of the additional payments (not including the on account credits to be applied) 4. Click on the Distribute $ Button
 5. Select the credit(s) and the amount(s) to apply towards the open invoice(s)Add to Line (Selecting a partial amount of the credit):Step 1: Click on the Add to Line Icon next to the credit to applyStep 2: Enter the amount of the credit to use (must be a negative value)Step 3: Click on the Add/Update Button
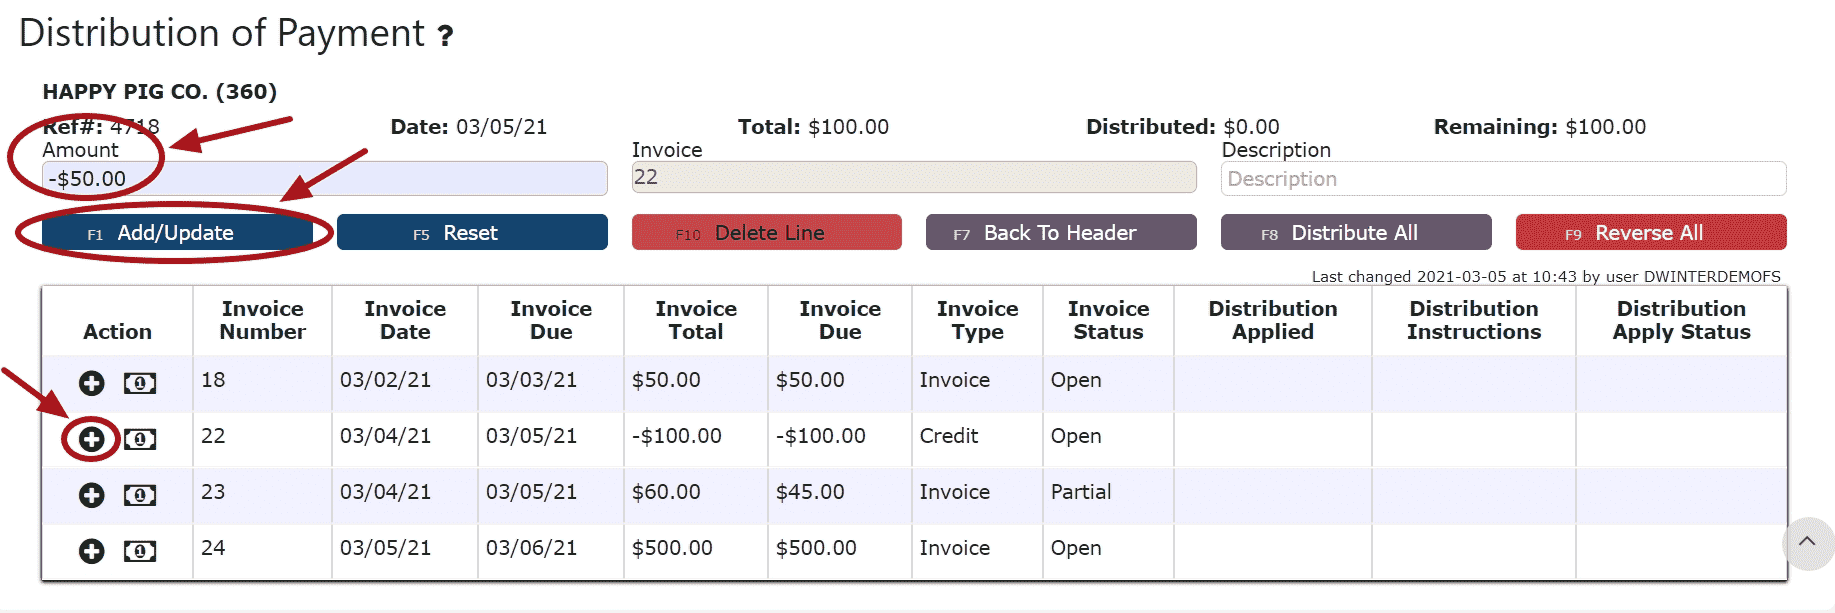 Take Full Credit Balance (applying the full amount of the credit):Step 1: Click on the Take Full Credit Balance Icon
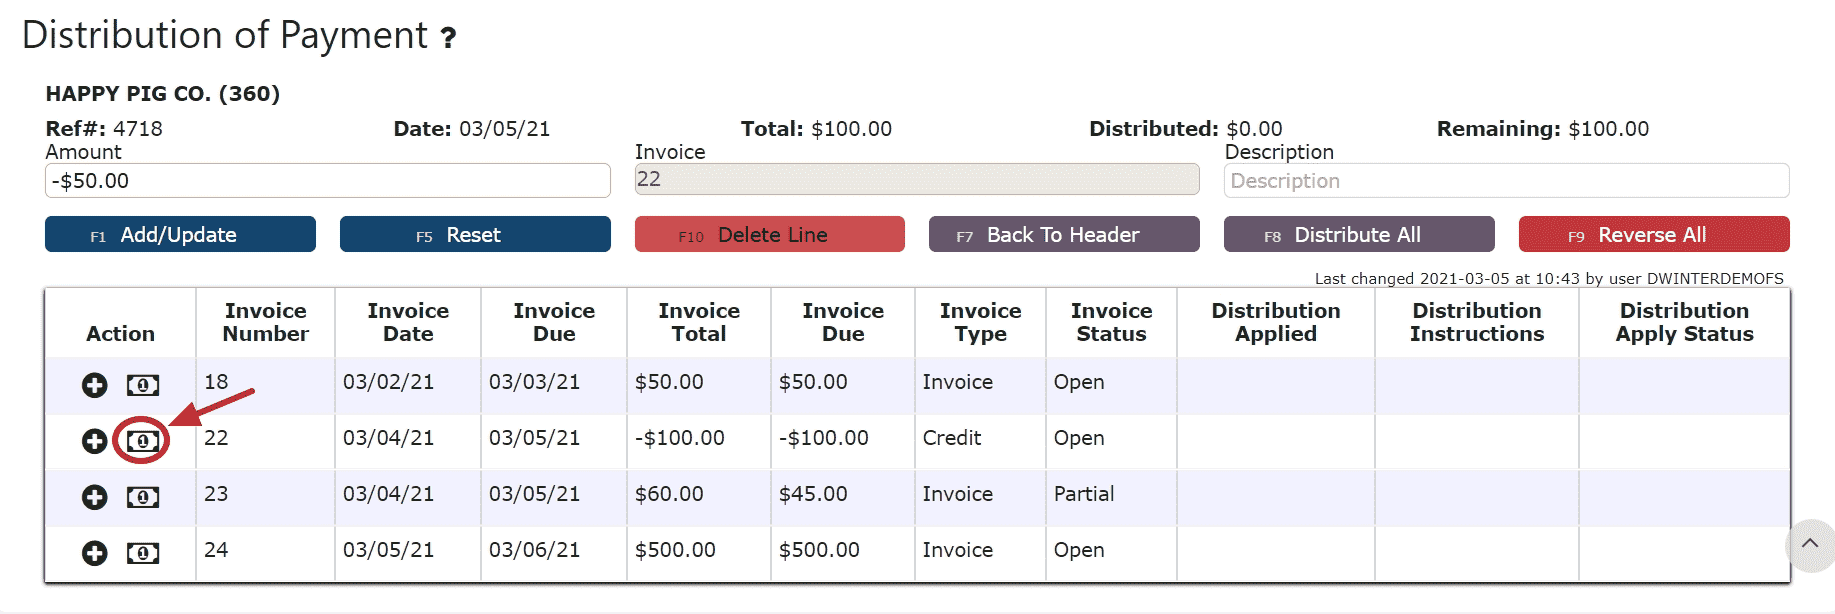 6. Distribute the amount of the credit(s) towards any open invoice(s) listed
Add to Line (paying a partial amount of the invoice):Step 1: Click on the Add to Line Icon next to the invoice to be paidStep 2: Enter the amount of the invoice to payStep 3: Click on the Add/Update Button Auto Pay Remaining Balance (paying the entire amount of the invoice):Step 1: Click on the Auto Pay Remaining Balance Icon
For On Account Credits + Additional Payments Only:
7. Apply the total payment amount towards any remaining open invoices using the Add to Line Icon or Auto Pay Remaining Balance Icon next to the open invoice to pay
Note: The total amount of the payment must equal the total amount distributed to open invoices in order to close the payment. The remaining amount to apply will indicate how much of the total payment is still left to distribute and will indicate $0 when all has successfully been applied. 8. Click on the Back to Header Button
 9. Click on the Close Payment ButtonNote: Once closed, the cash receipt is ready to post
 10. Review the Cash Receipt that is ready to post
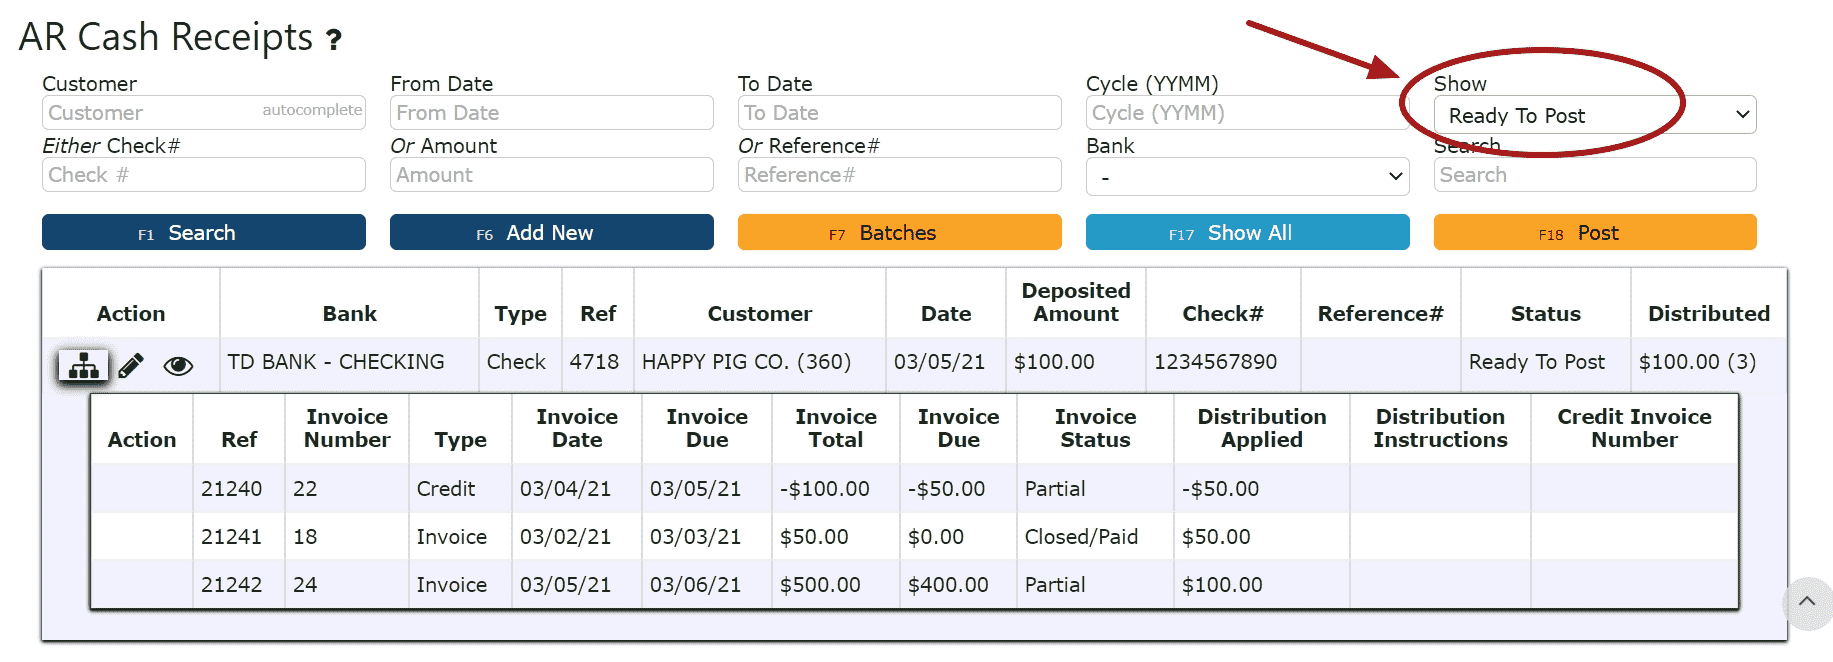 11. Click the Post ButtonNote:Cash Receipts will only post successfully if their date matches the end of day cutoff dateAny Cash Receipts left open/in progress will prevent the end of day process from automatically moving forward during the night
-
Creating an Overpayment AR Cash Receipt
1. Go to the Accounting Menu and click on the AR Cash Receipts Sub-Menu
 2. Click on the Add New Button
 3. Enter the customer who made the payment, select a payment date, payment type, and total payment amount. Enter a check # or reference # if applicable.Note:Reference numbers are required for Credit Card and ACH/Transfer/Wire Payments. Once a Credit Card or ACH/Transfer/Wire Payment has been completed from an outside source, the reference number generated from that transaction must be included as part of the corresponding AR Cash Receipt.Check numbers are required for all payments made by check
 4. Click on the Distribute $ Button
 5. Distribute the amount of the payment towards any open invoice(s) listedAdd to Line (paying a partial amount of the invoice):Step 1: Click on the Add to Line Icon next to the invoice to be paidStep 2: Enter the amount of the invoice to payStep 3: Click on the Add/Update Button
 Auto Pay Remaining Balance (paying the entire amount of the invoice):Step 1: Click on the Auto Pay Remaining Balance Icon
 Distribute All (distributes the entire amount of the payment to the invoices starting from the top of the list, up until the payment amount runs out):Step 1: Click on the Distribute All Button
 6. Click on the Back to Header Button
 7. Click on the $ on Account Icon, then click Ok on the pop up prompt, to apply the remainder of the payment on account. The AR Cash Receipt will automatically close and be placed in Ready to Post Status.
 8. Review the Cash Receipt that is ready to post
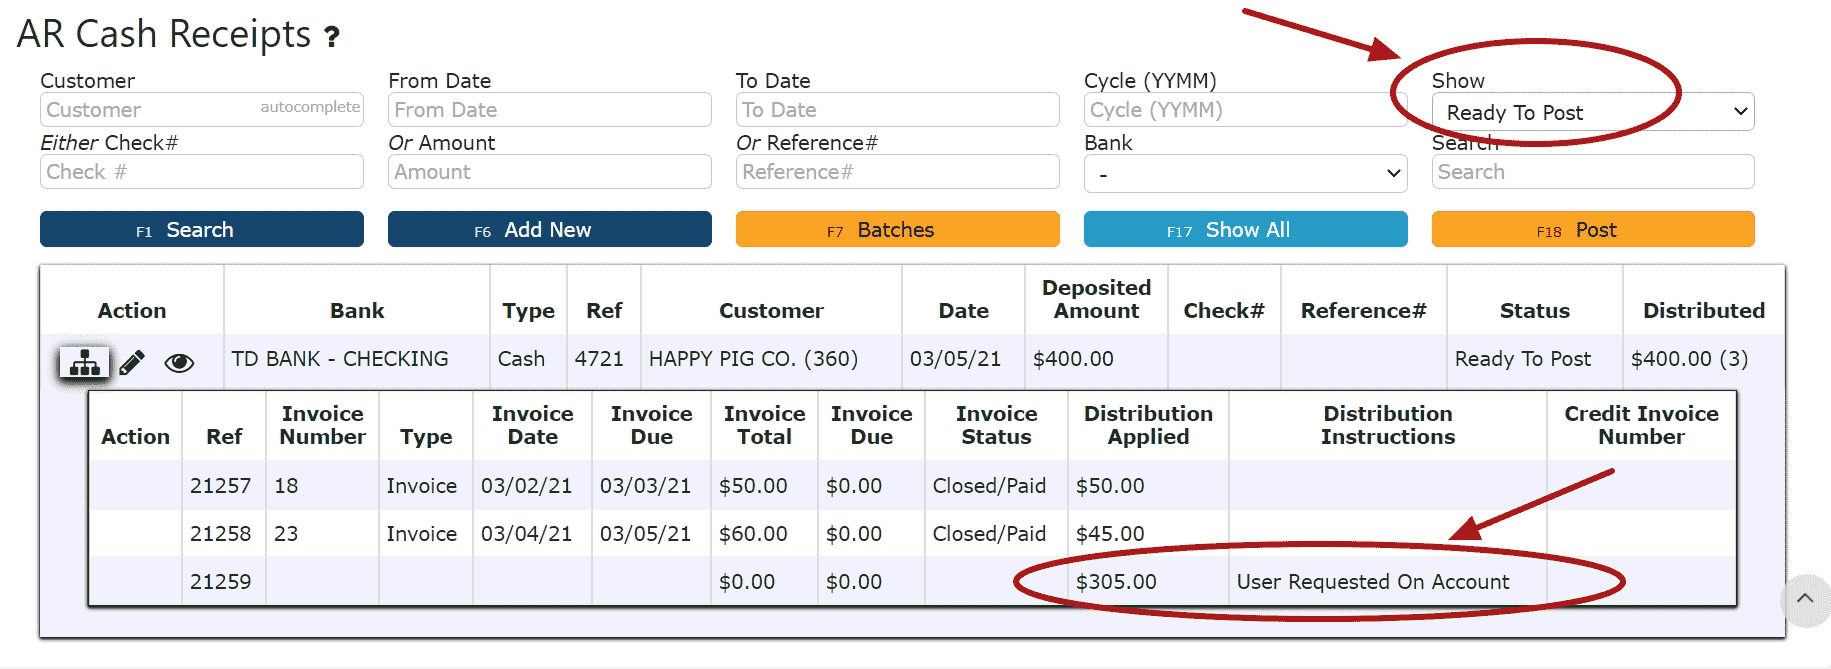 9. Click the Post ButtonNote:Cash Receipts will only post successfully if their date matches the end of day cutoff dateAny Cash Receipts left open/in progress will prevent the end of day process from automatically moving forward during the night
-
Editing an AR Cash Receipt
1. Click on the Edit Payment Icon (Pencil) next to the AR Cash Receipt to be edited
 If Closed:2. Click on the Open Button to re-open the AR Cash Receipt.
 3. Make any necessary changes to the details of the AR Cash Receipt
Reversing a Line (Reverses the distribution made to that particular invoice/credit):
Step 1: Click on the Reverse Line Icon (X) next to the invoice/credit to reverse payment on
Deleting a Line: (Deletes the distribution made to that particular invoice/credit):
Step1: Click on the Edit Line Icon (Pencil)
Step 2: Click on the Delete Line Button
Reversing All Distributions (Deletes/Reverses all distributions made across all invoices/credits:
Step 1: Click on the Reverse All Button
Editing a Line:
Step 1: Click on the Edit Line Icon (Pencil)
Step 2: Make Any necessary changes to the amount and/or description for that line
Step 3: Click on the Add/Update Button
5. Click on the Back to Header Button 6. Make any necessary changes to the Header, click the Distribute $ Button to save any Total Payment changes, then go back to the header and click on the Close Button if ready to close and post the AR Cash Receipt
 7. Click on the Post Button to post the AR Cash ReceiptNote: AR Cash Receipts will only post successfully if their date matches the end of day cutoff dateAny AR Cash Receipts left open/in progress will prevent the end of day process from automatically moving forward during the night
 If Open:2. Adjust any of the header information as necessary.
 3. Click on the Distribute $ Button to make changes to the details of the AR Cash Receipt
 4. Make any necessary changes to the details of the AR Cash Receipt
Reversing a Line (Reverses the distribution made to that particular invoice/credit):
Step 1: Click on the Reverse Line Icon (X) next to the invoice/credit to reverse payment on
Deleting a Line: (Deletes the distribution made to that particular invoice/credit):
Step1: Click on the Edit Line Icon (Pencil)
Step 2: Click on the Delete Line Button
Reversing All Distributions (Deletes/Reverses all distributions made across all invoices/credits:
Step 1: Click on the Reverse All Button
Editing a Line:
Step 1: Click on the Edit Line Icon (Pencil)
Step 2: Make Any necessary changes to the amount and/or description for that line
Step 3: Click on the Add/Update Button
5. Click on the Back to Header Button 6. Click on the Close Button if ready to close and post the AR Cash Receipt
 7. Click on the Post Button to post the entryNote:AR Cash Receipts will only post successfully if their date matches the end of day cutoff dateAny AR Cash Receipts left open/in progress will prevent the end of day process from automatically moving forward during the night
-
Deleting an AR Cash Receipt
1. Click on the Edit Payment Icon (Pencil) next to the AR Cash Receipt to be deleted
 If Closed:2. Click on the Open Button to re-open the AR Cash Receipt
3. Click on the Back to Header Button 4. Click on the Delete Payment Button, then click Ok on the pop up promptNote:Once deleted, an AR Cash Receipt is permanently removed and can no longer be retrieved
 If Open:2. Click on the Delete Payment Button, then click Ok on the pop up promptNote: Once deleted, an AR Cash Receipt is permanently removed and can no longer be retrieved
-
Troubleshooting Batch Errors
1. Click on the Batches Button
 2. Remove the date
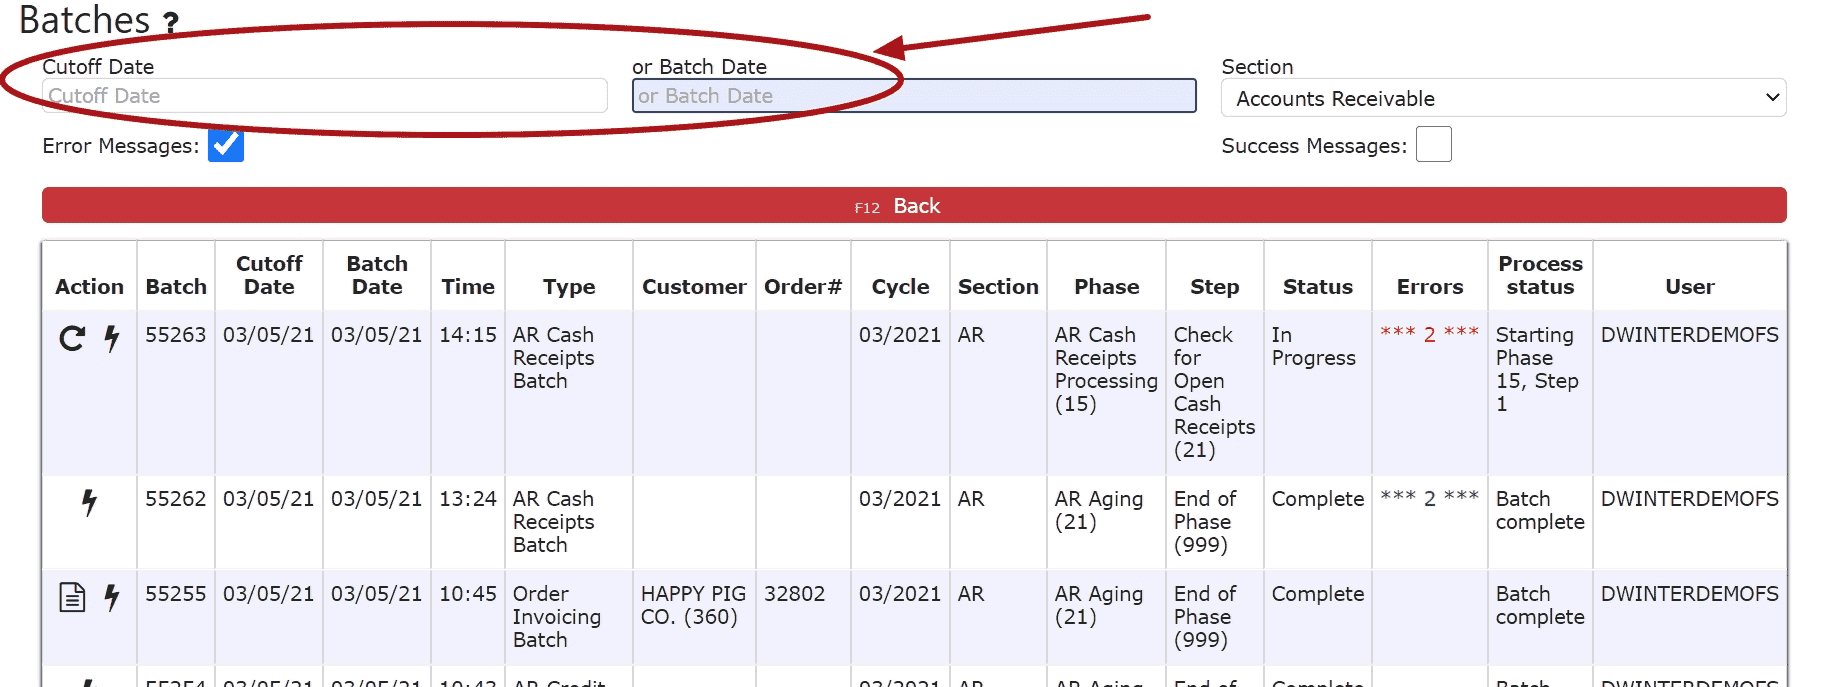 3. Locate the error batch that contains errors in red and a Re-Start This Batch Icon (Circle Arrow)Note: Any AR Batch Error that has not been resolved will prevent any transactions from posting successfully (including AR Cash Receipts)
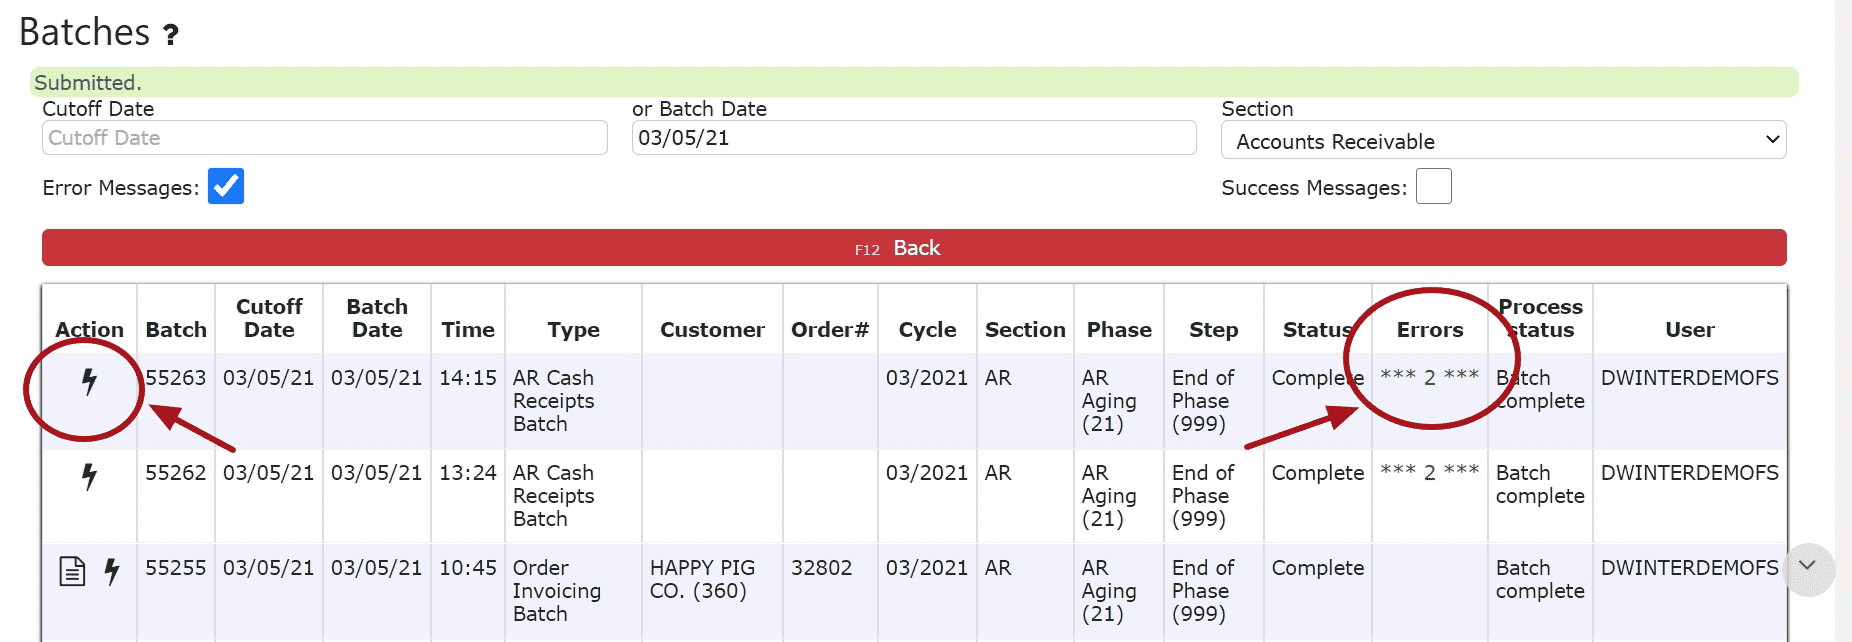
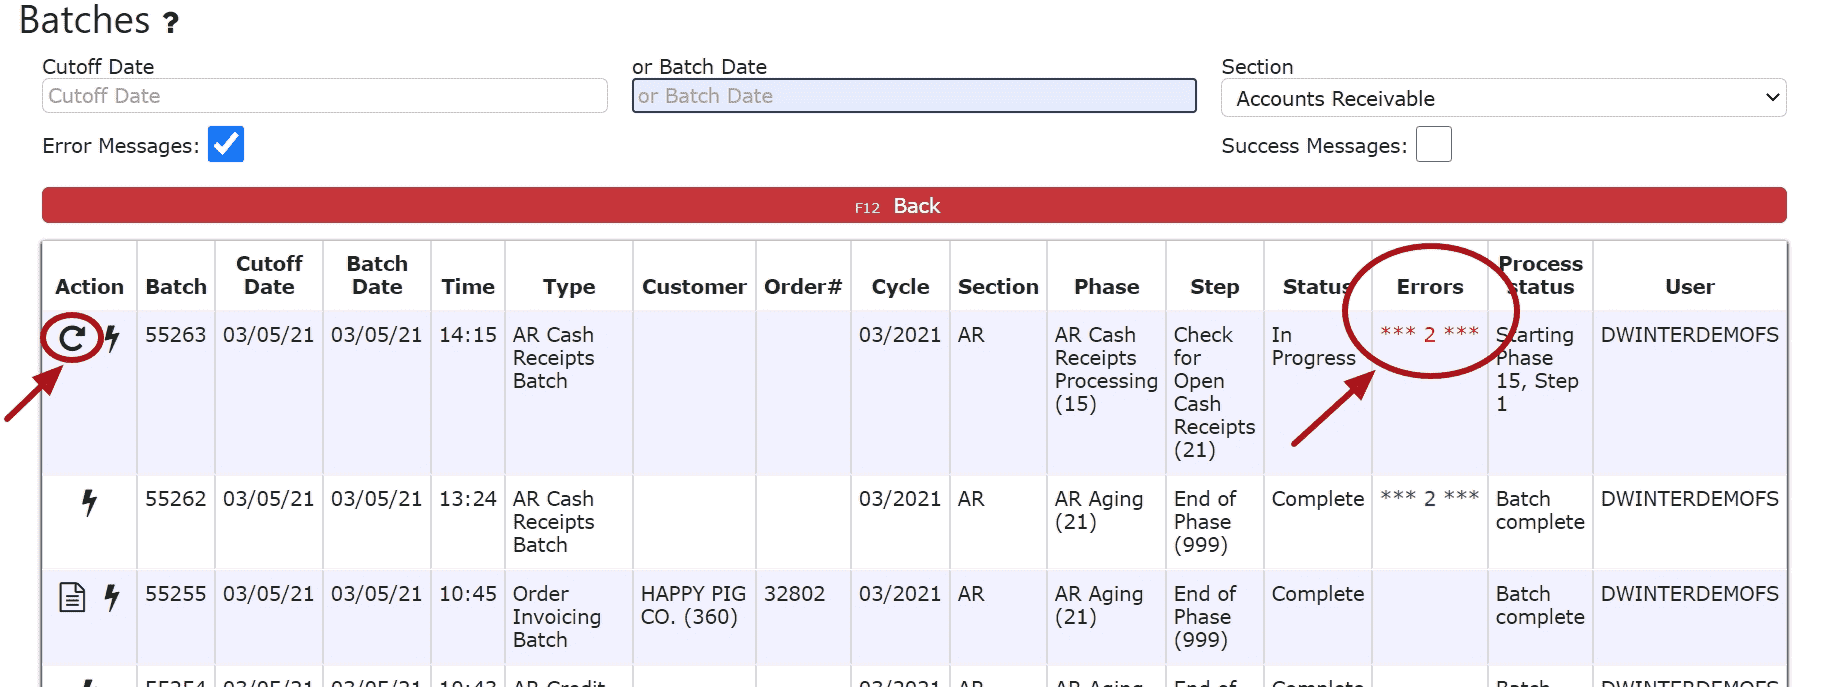 4. Click on the Batch Messages Icon (Lightning Bolt) next to the Error Batch in question
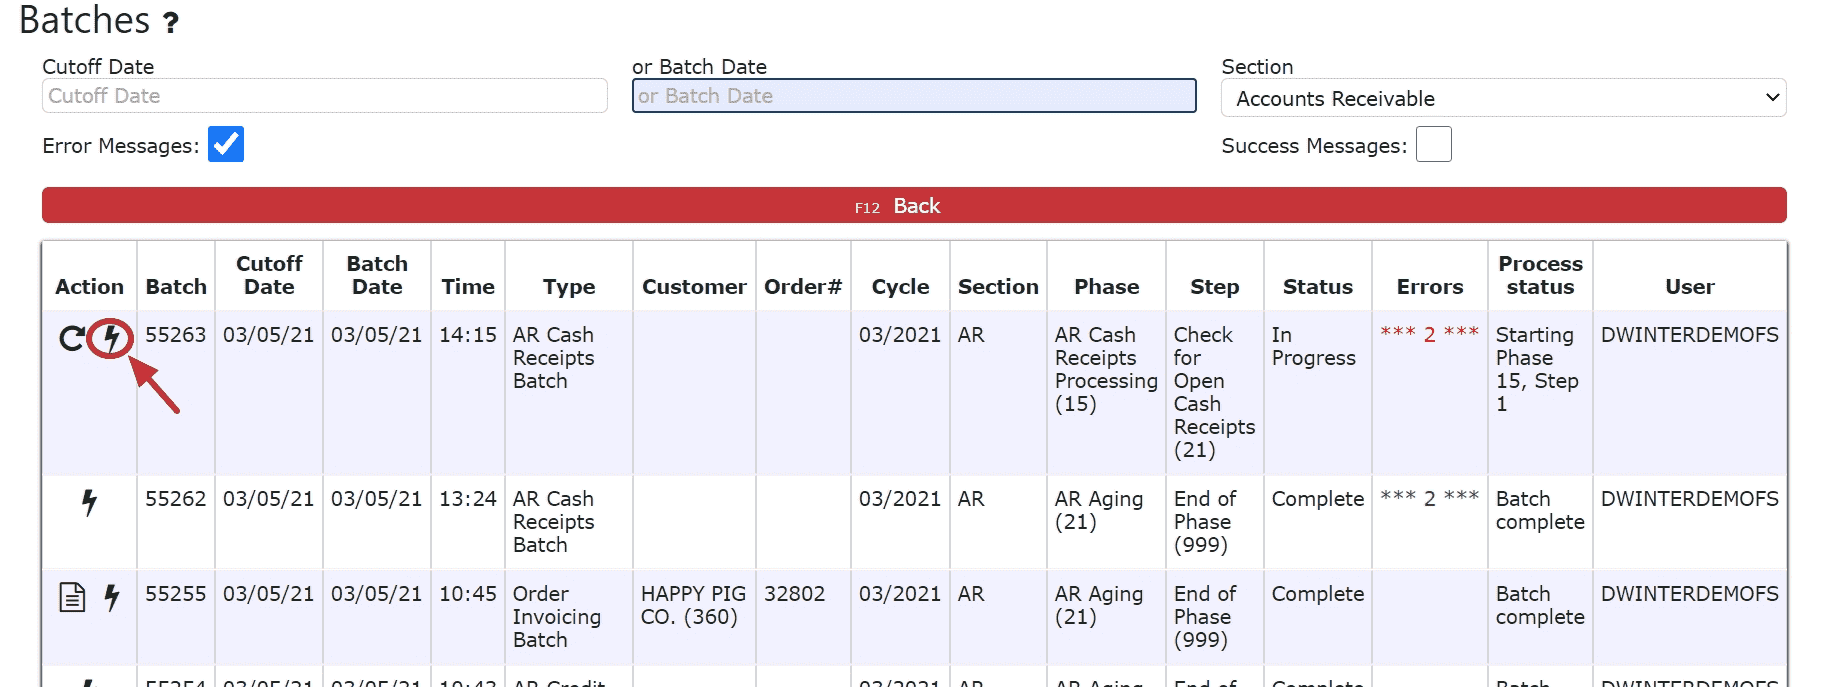 5. Review the errors preventing the AR Cash Receipt from posting
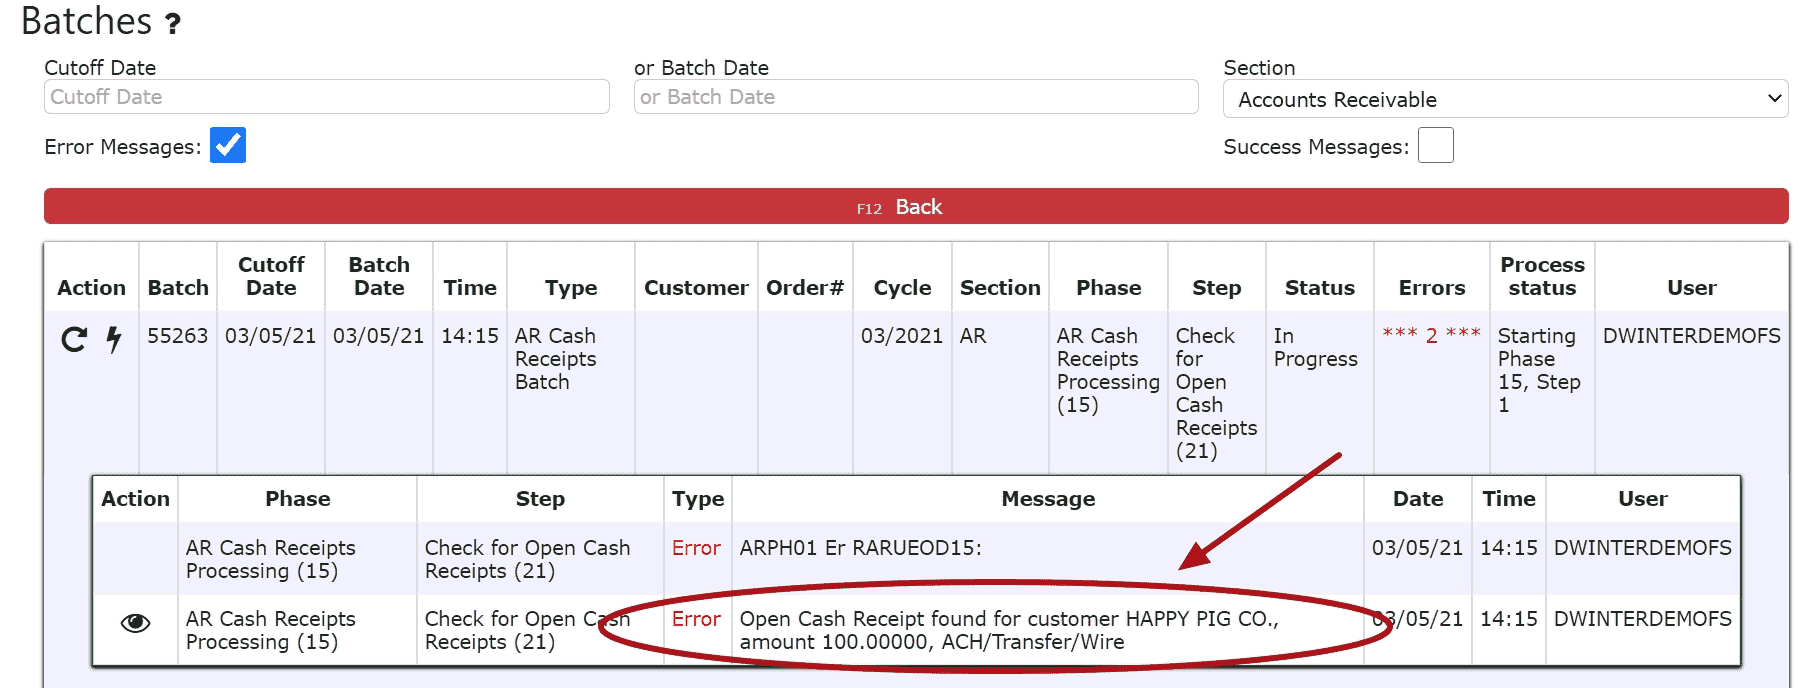 6. Resolve each error listed in the batch. Click on the eyeball next to each error to be automatically redirected to the order/transaction in question.
For Open Orders:Either invoice, cancel or forward date the order
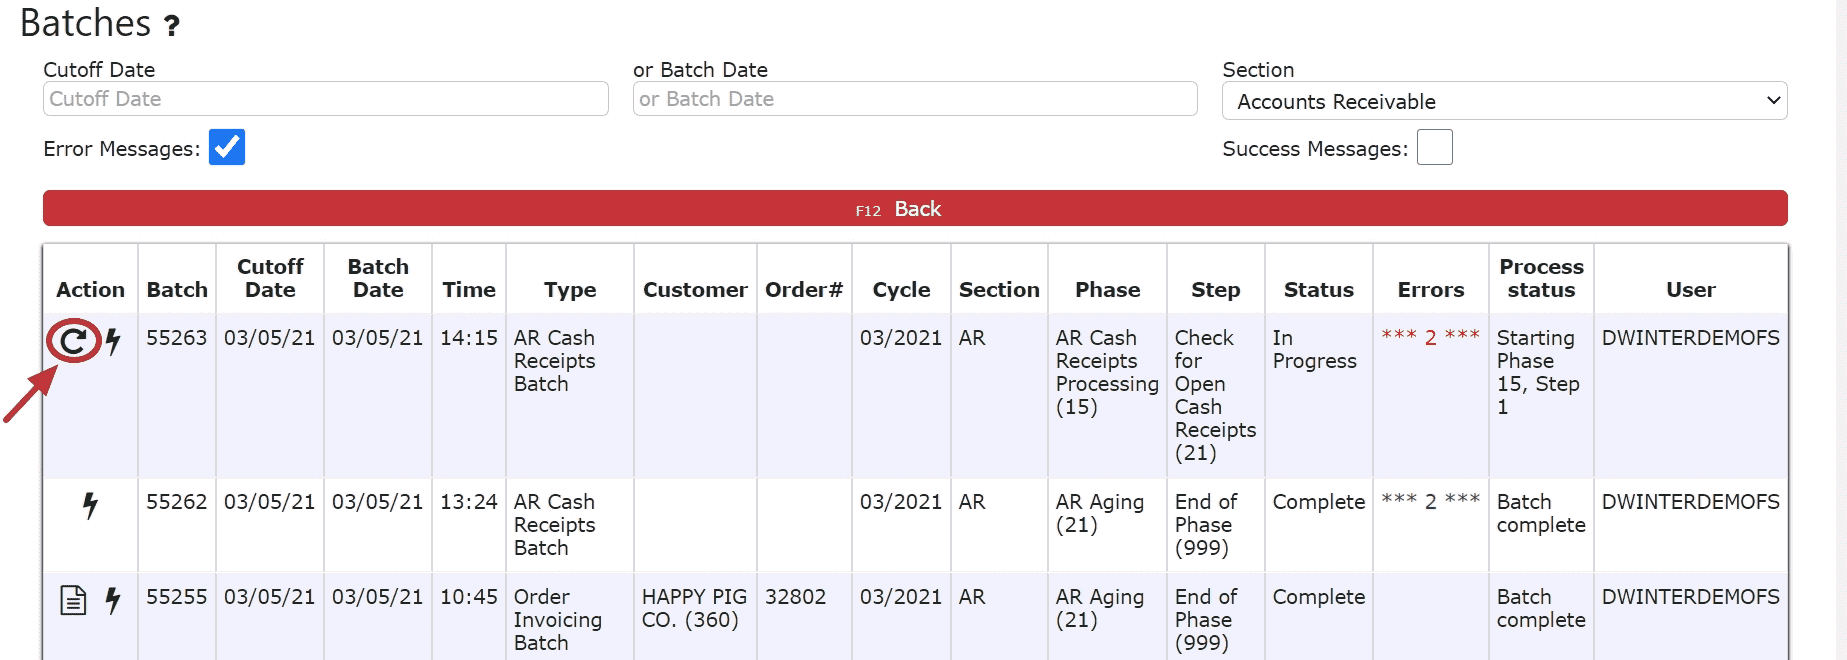
For Open/In Progress Transactions (AR Credits, AR Misc. Cash Entries, AR Cash Receipts, AR Adjustments):Either close and post, cancel or forward date the transaction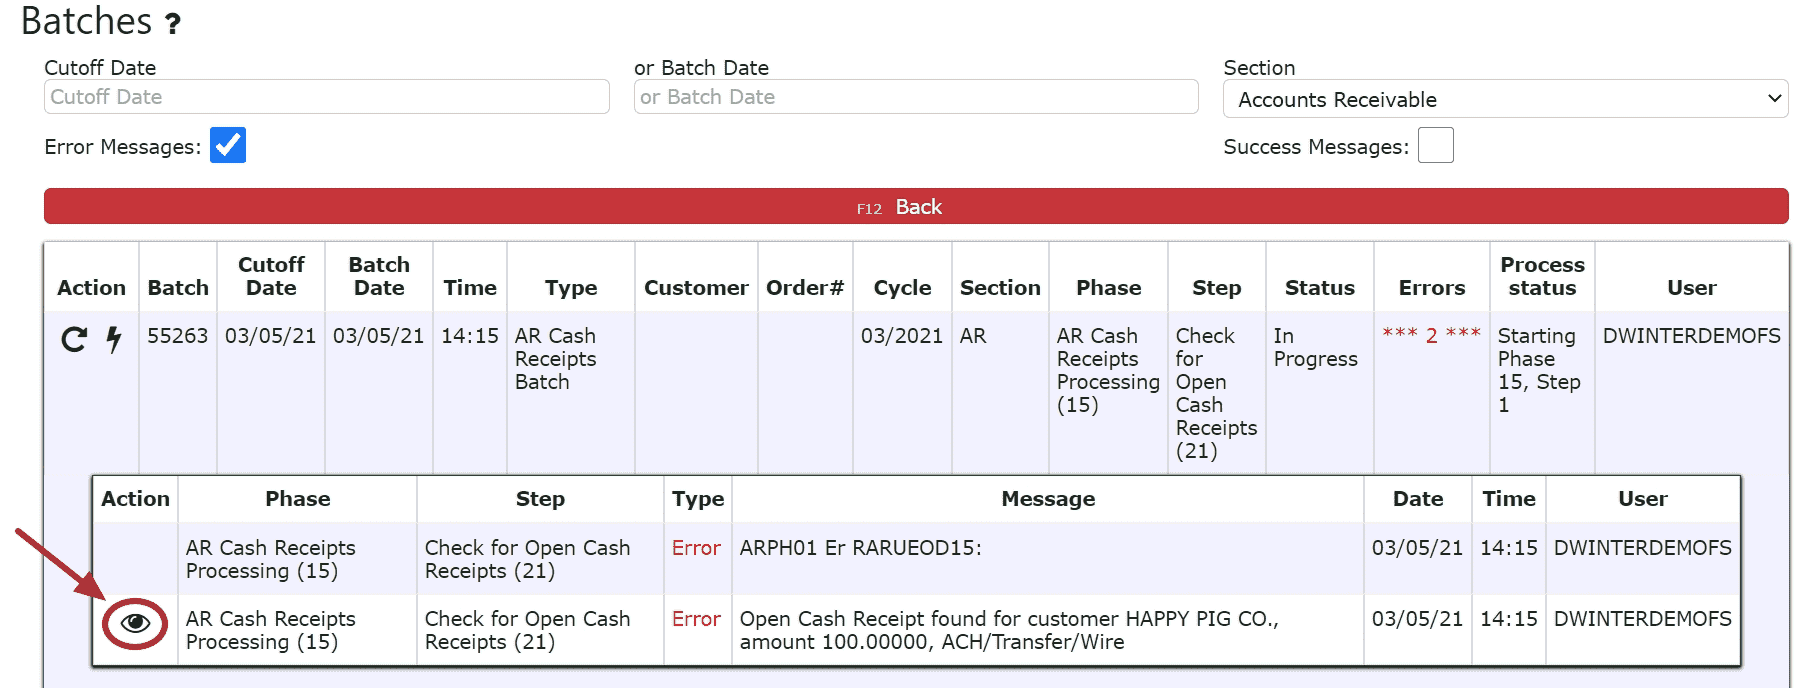 7. After all errors have been resolved, go back to AR Batches and click on the Re-Start This Batch Icon to re-start the error batch. The AR Cash Receipt will automatically post, the Re-Start this Batch icon will dissapear and the red errors will turn green, if the batch is successful.
AR Credits
-
Key Information
Create and maintain on account credits and credits against invoices.Credit Statuses:In Progress -> the credit is open and is able to be editedPosted -> the credit has been posted and cannot be editedReady to Post -> the credit has been closed and is ready for posting, it cannot be edited when closed, but can be reopened if edits are necessary
Note: Posting will only successfully go through if the credit date equals the current cutoff date
-
Creating and Posting Against Invoice Credits
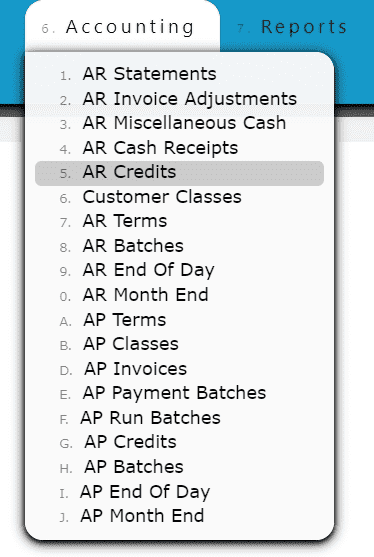
1. Go to the Accounting Menu and click on the AR Credits Sub-Menu
 2. Click on the Add New Button
 3. Enter the customer, the credit date, select Against Invoice as the credit type, fill in the credit amount, the invoice #, and select the reason for the credit (A reason code here at the header is required if choosing to use the auto credit/credit all options when distributing). Fill in any additional notes if applicable.
 4. Click on the Distribute Credit Button
 5. Distribute the amount of the credit towards any open invoice(s) listedEdit Line (crediting a partial amount of the invoice):Step 1: Click on the Edit Line Icon next to the invoice to be creditedStep 2: Enter the Invoice Quantity to Credit and select a reason for the creditNote: Credits against invoices must be done per quantity, otherwise On Account Credits must be used
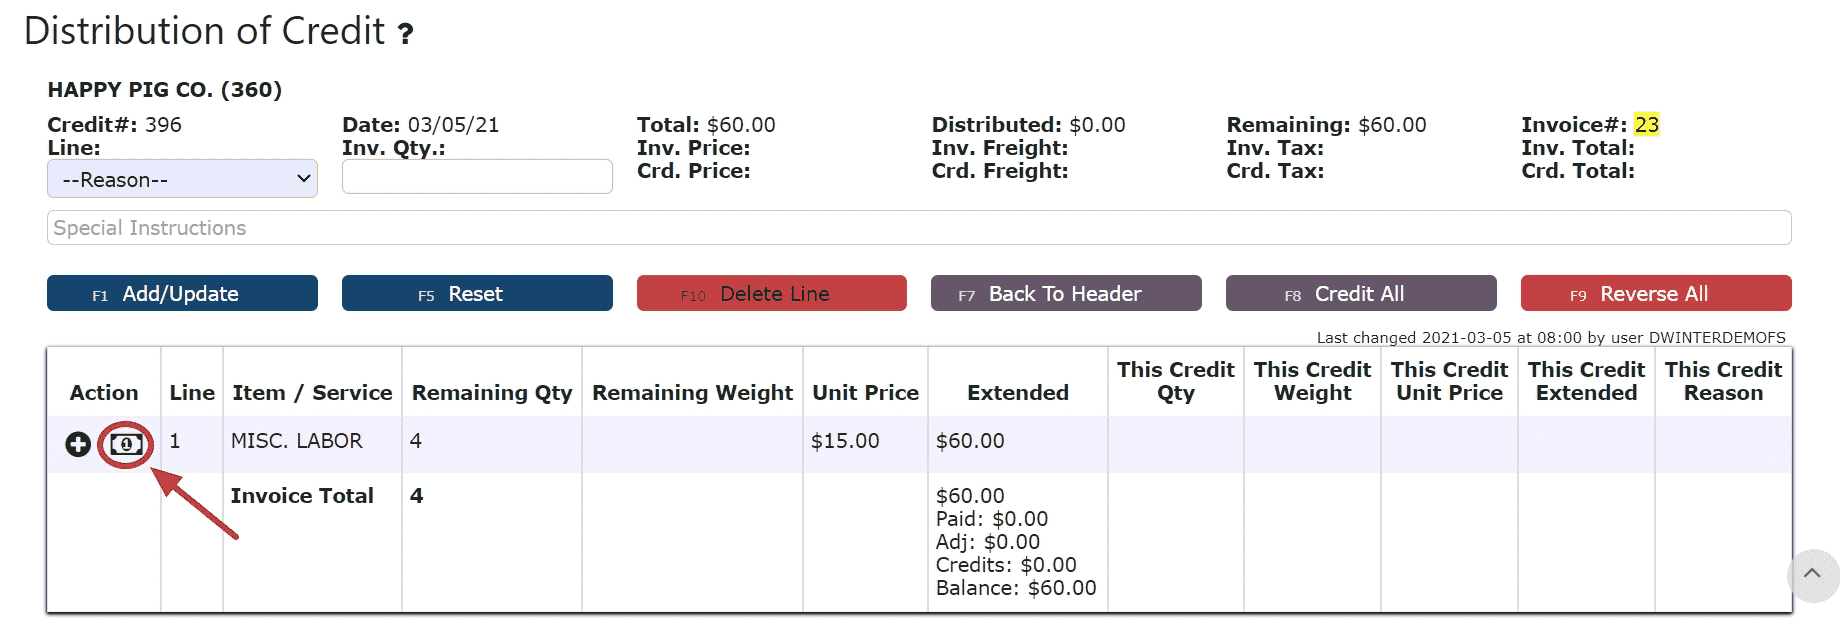
Step 3: Click on the Add/Update Button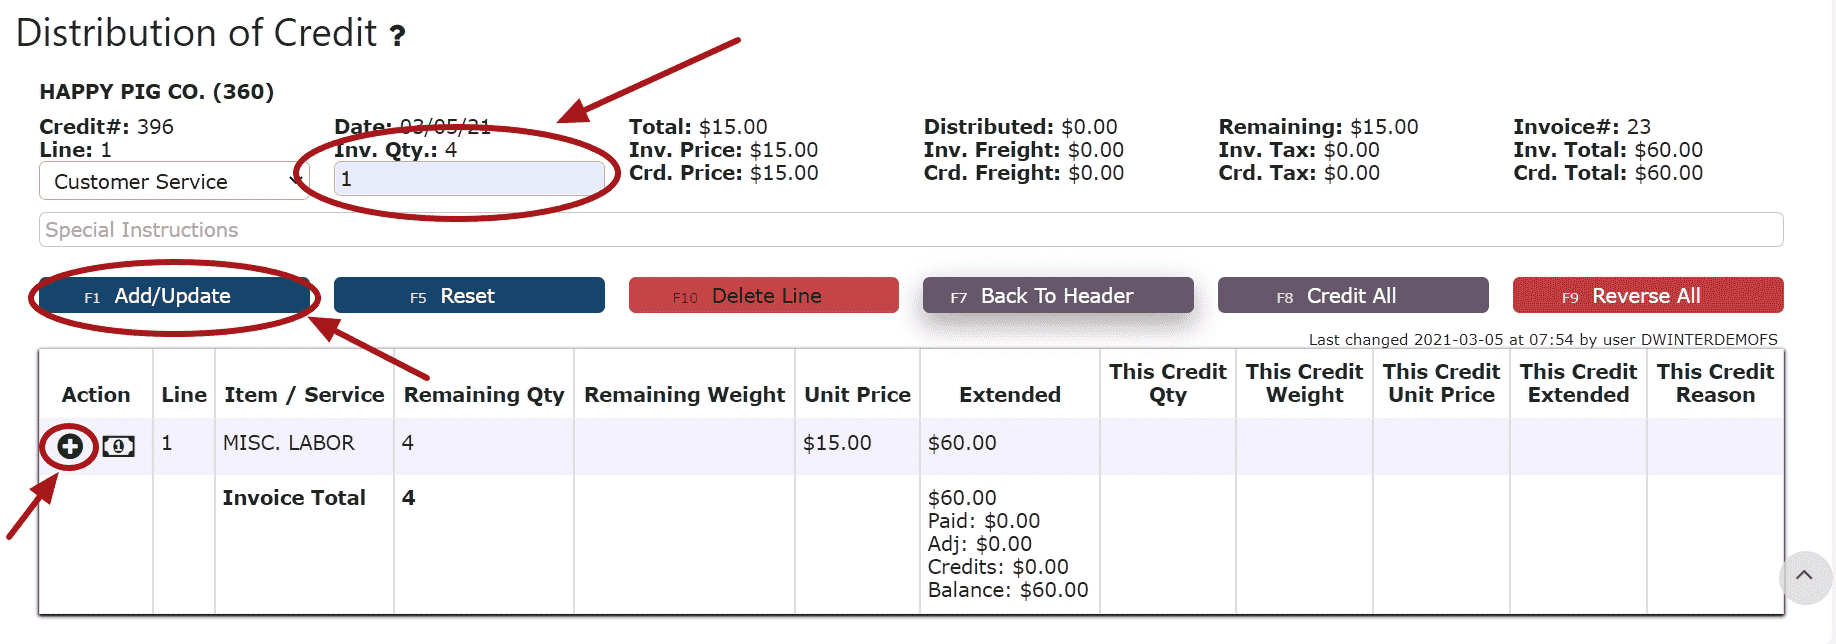 Auto Credit Remaining Balance (crediting the entire amount of the invoice):Note: A reason at the header is required if choosing to use the auto credit/credit all options when distributingStep 1: Click on the Auto Credit Remaining Balance Icon
 Credit All (distributes credits to all the invoices for the full remaining amounts):Step 1: Click on the Credit All Button
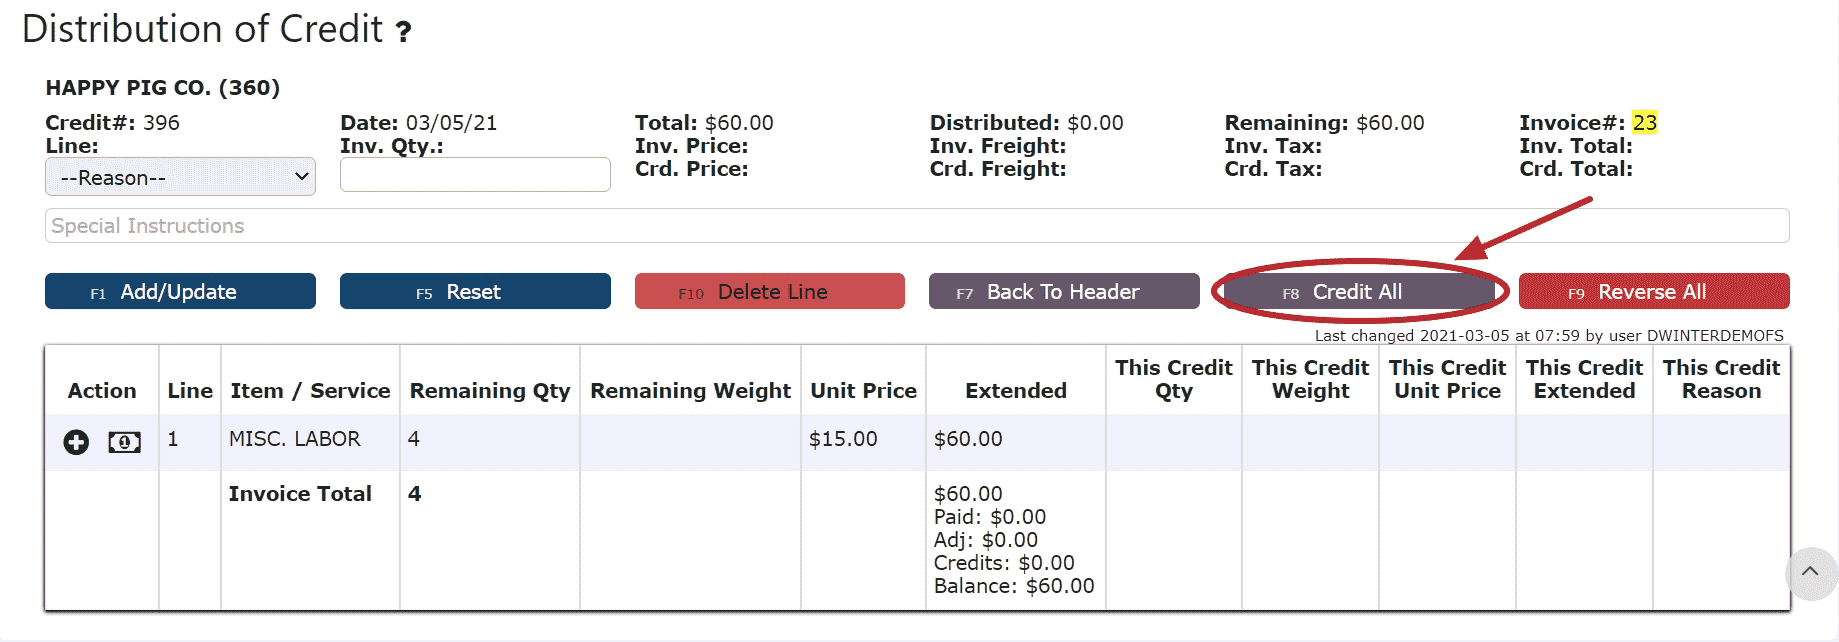 6. Click on the Back to Header Button
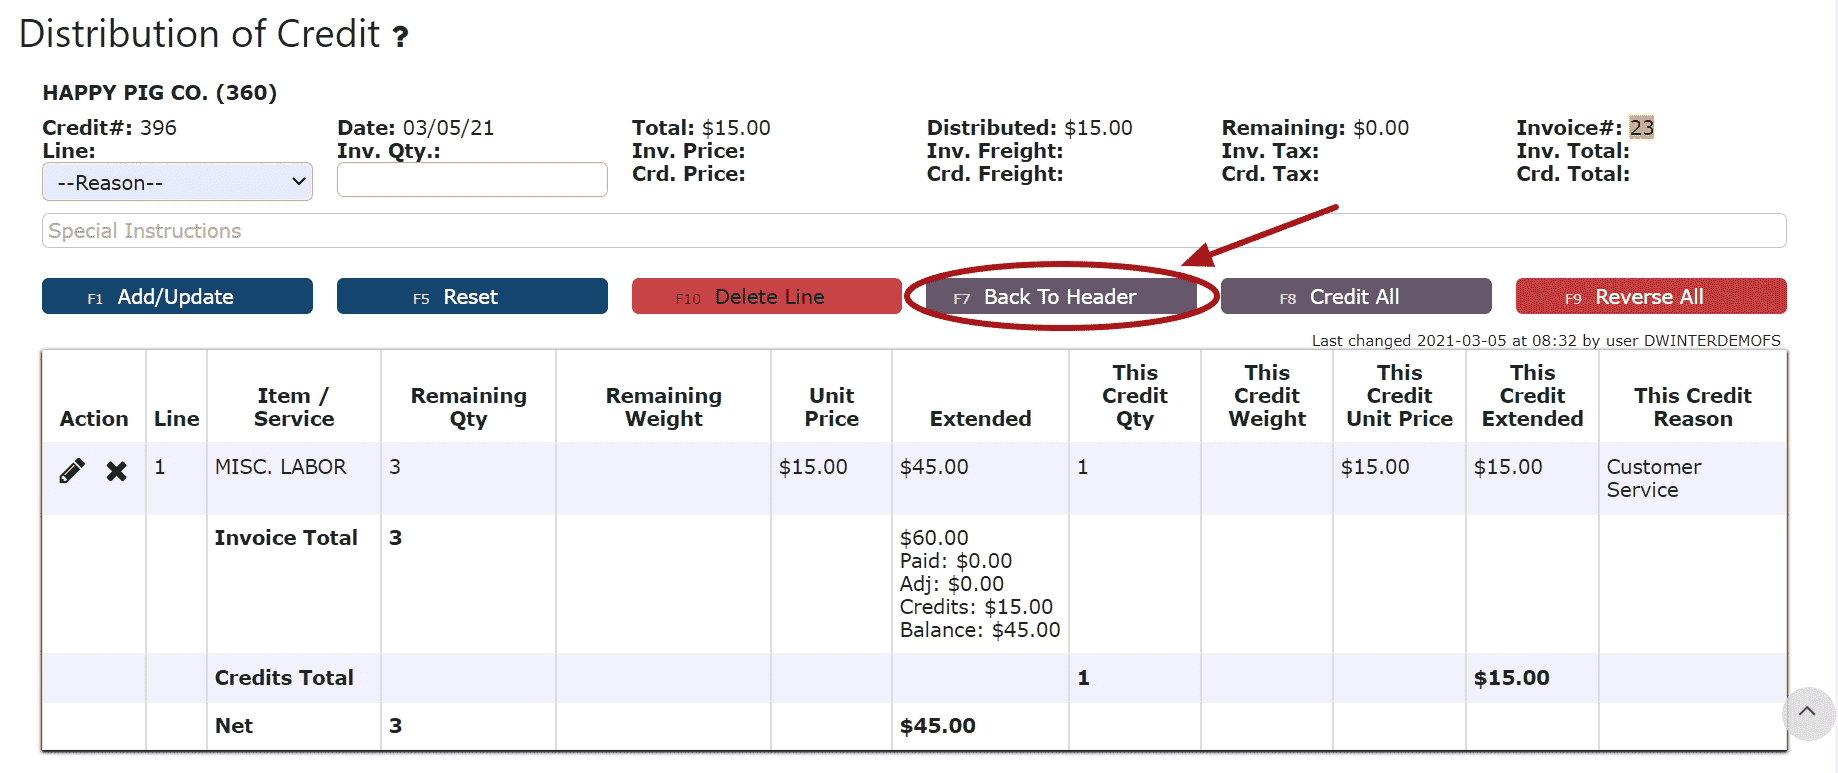 7. Click on the Close Credit ButtonNote: Once closed, the credit is ready to post
 8. Review the Credit that is ready to post
 9. Click the Post ButtonNote:Credits will only post successfully if their date matches the end of day cutoff dateAny Credits left open/in progress will prevent the end of day process from automatically moving forward during the night
-
Creating and Posting On Account Credits
1. Go to the Accounting Menu and click on the AR Credits Sub-Menu

2. Click on the Add New Button
3. Enter the customer, the credit date, select On Account Credit as the credit type, fill in the credit amount, and select the reason for the credit. Fill in any additional notes if applicable.
4. Click on the Save & Exit Button
5. The On Account Credit has been automatically closed and is now Ready to Post
6. Review the On Account Credit
7. Click on the Post ButtonNote:Credits will only post successfully if their date matches the end of day cutoff dateAny Credits left open/in progress will prevent the end of day process from automatically moving forward during the night
8. The On Account Credit is now ready to be applied to any open invoice through a cash receipt. Proceed to follow the steps for Applying an On Account Credit through an AR Cash Receipt.
-
Editing AR Credits
1. Click on the Edit Credit Icon (Pencil) next to the AR Credit to be edited
 If Closed:2. Click on the Open Credit Button to re-open the AR Credit.
 4. Make any necessary changes to the details of the AR Credit (Against Invoice Credits Only)Reversing a Line (Reverses the distribution made to that particular invoice):Step 1: Click on the Reverse Line Icon (X) next to the invoice to reverse the credit applied to that invoice
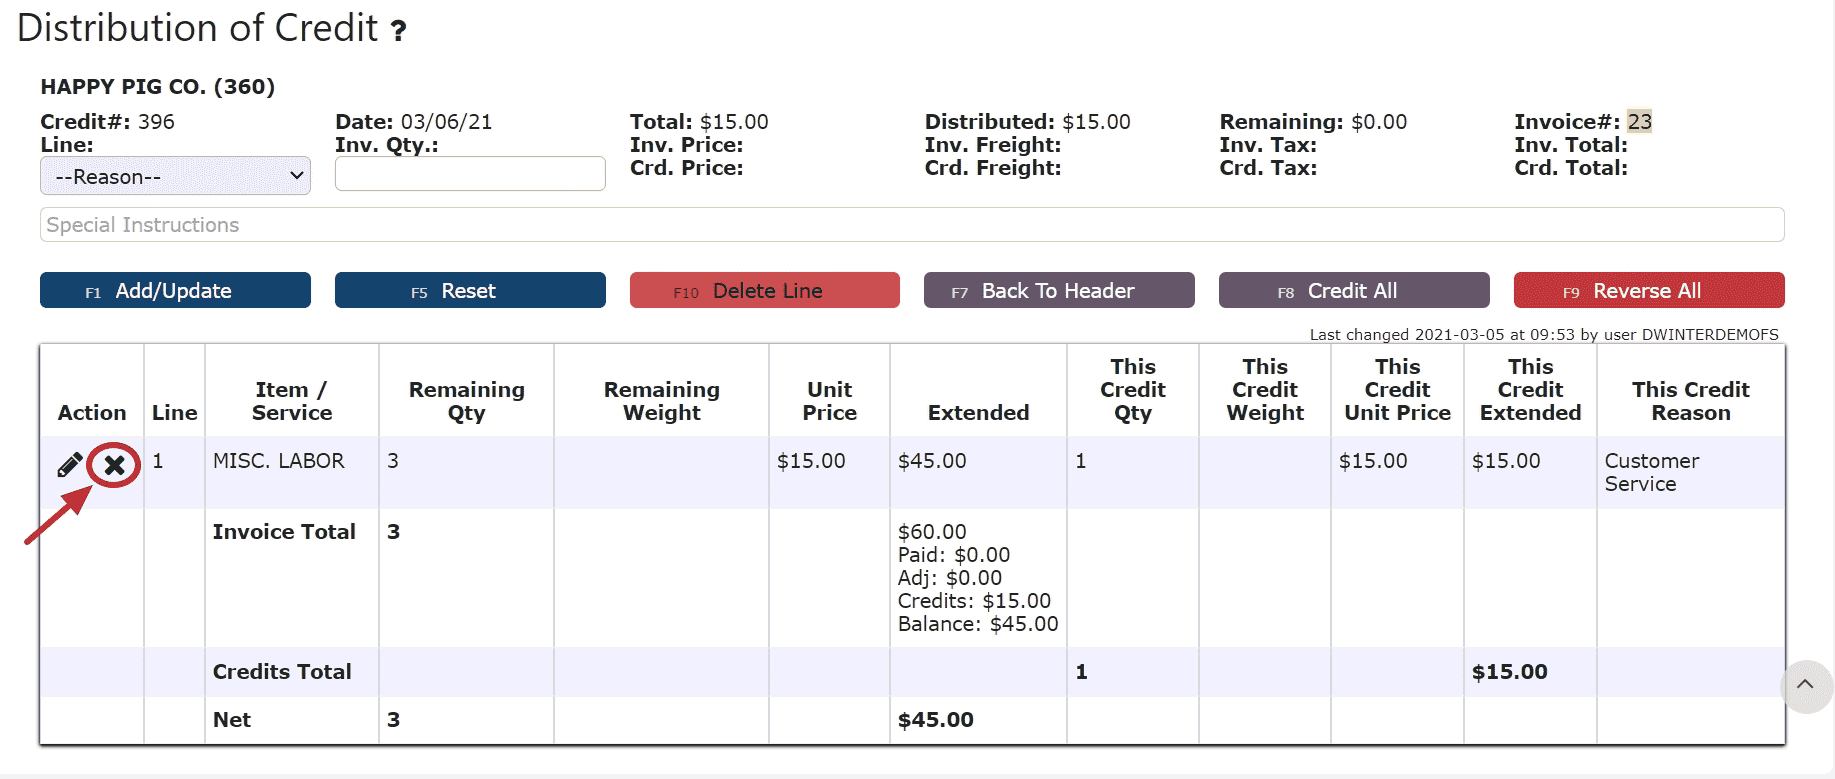 Deleting a Line: (Deletes the distribution made to that particular invoice):Step1: Click on the Edit Line Icon (Pencil)Step 2: Click on the Delete Line Button
Step 3: Click OK on the pop prompt to confirm the submission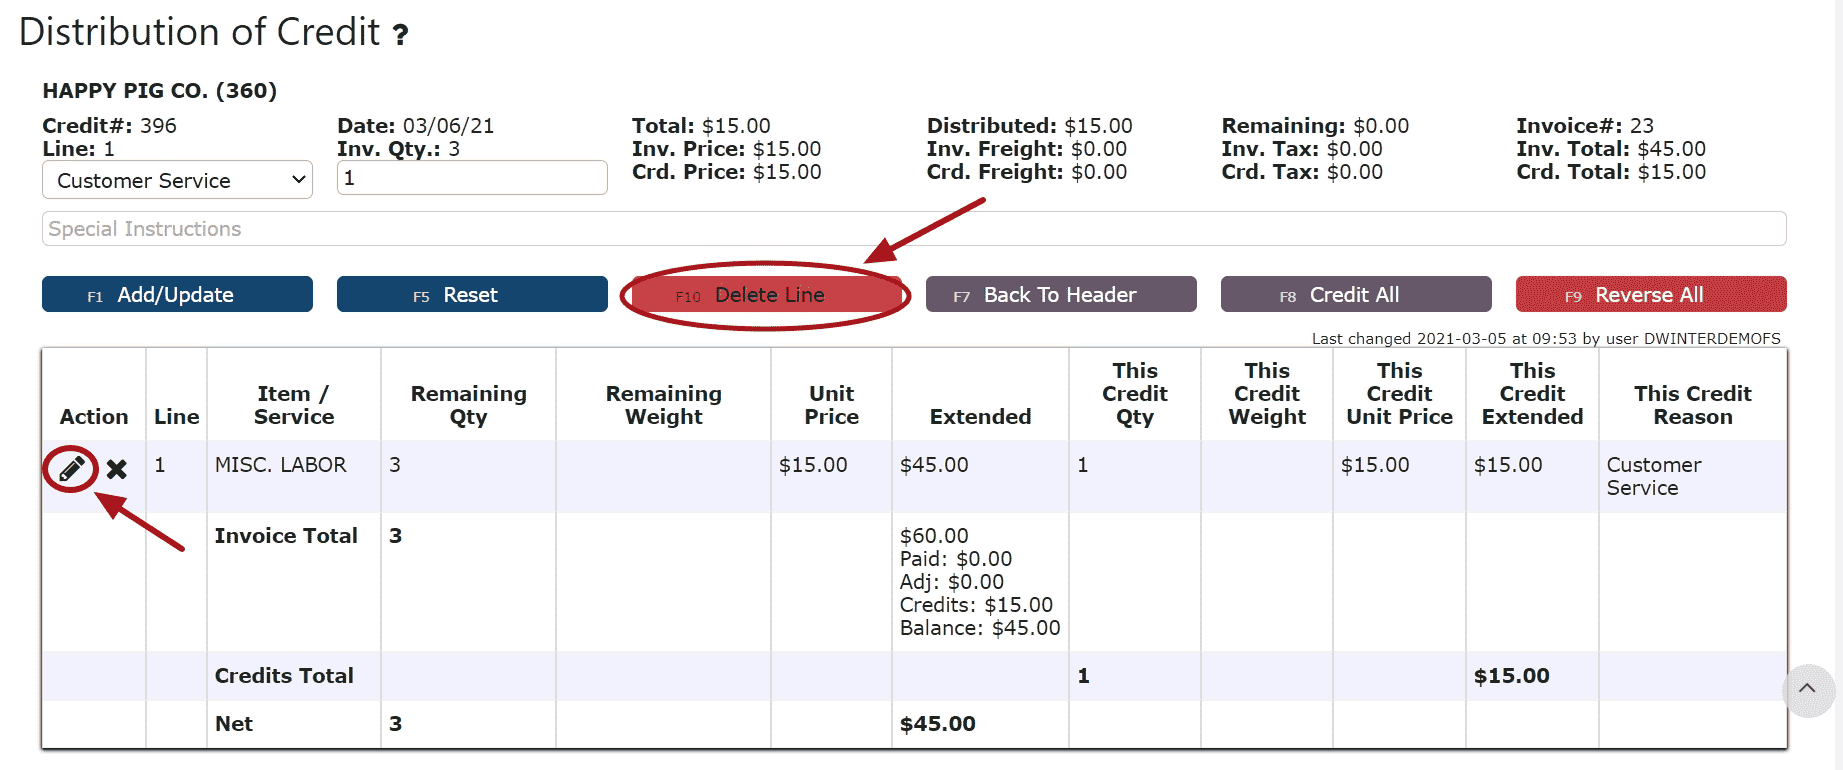 Reversing All Distributions (Deletes/Reverses all distributions made across all invoices:Step 1: Click on the Reverse All Button
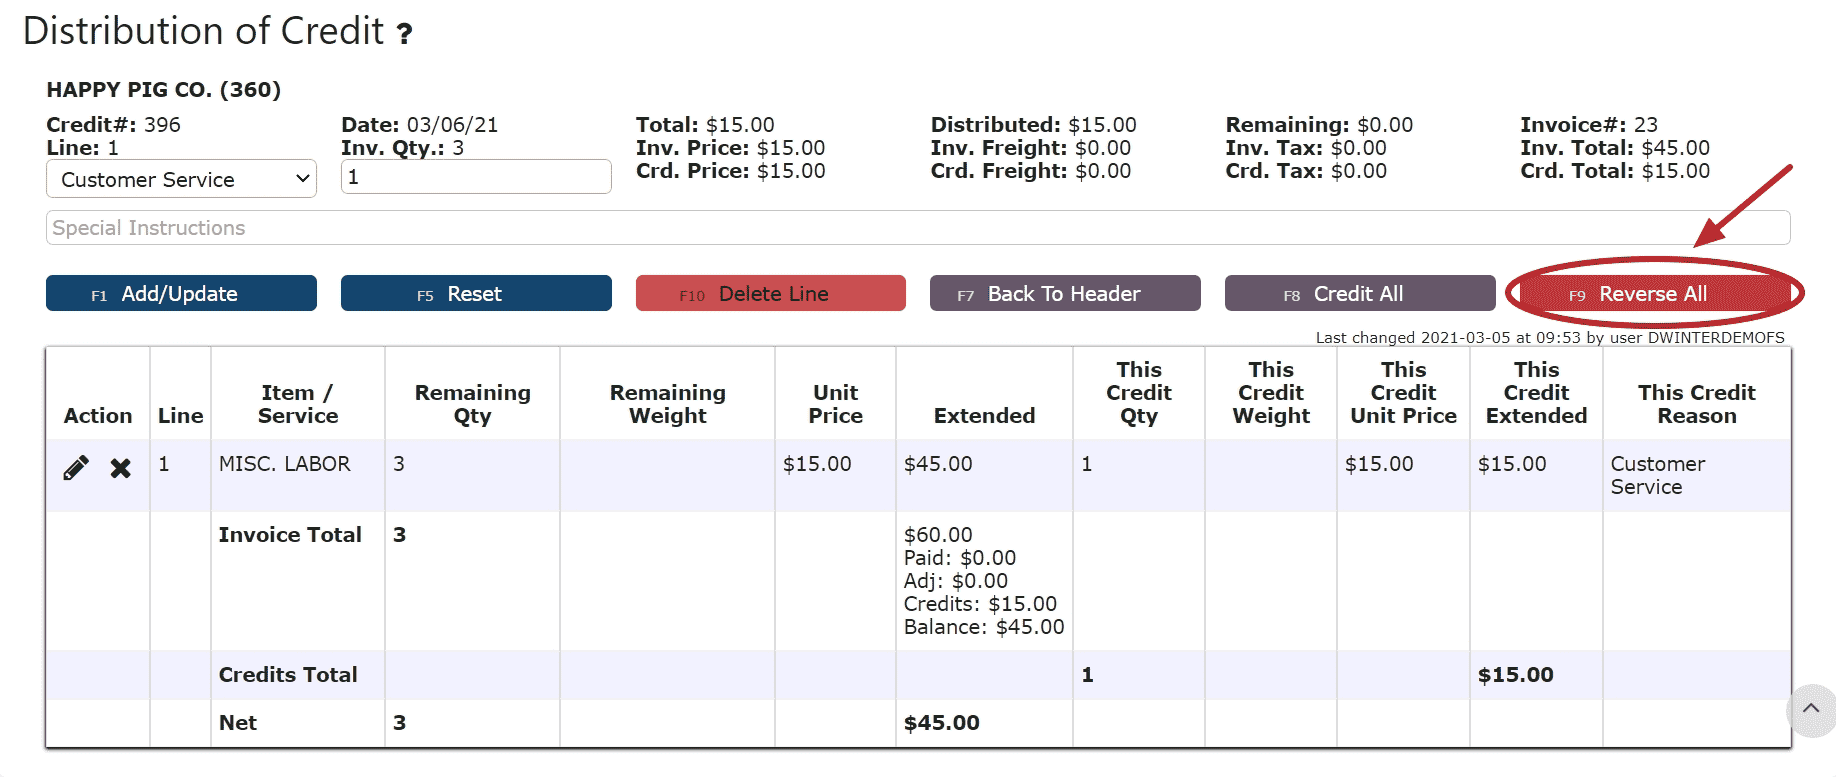 Editing a Line:Step 1: Click on the Edit Line Icon (Pencil)Step 2: Make Any necessary changes to the amount and/or description for that lineStep 3: Click on the Add/Update Button
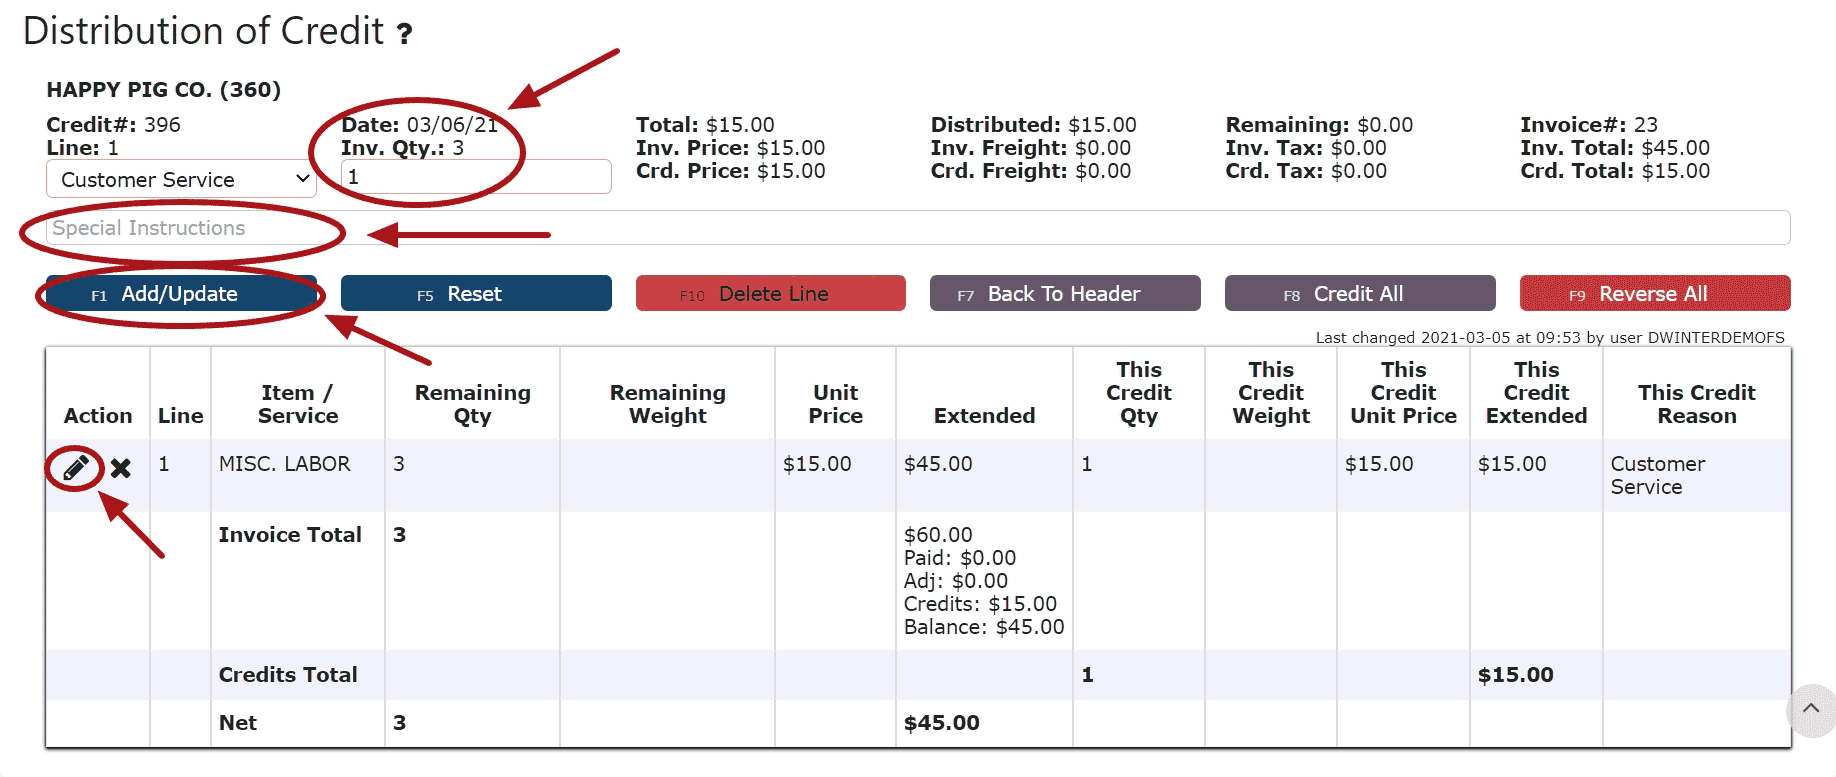 5. Click on the Back to Header Button
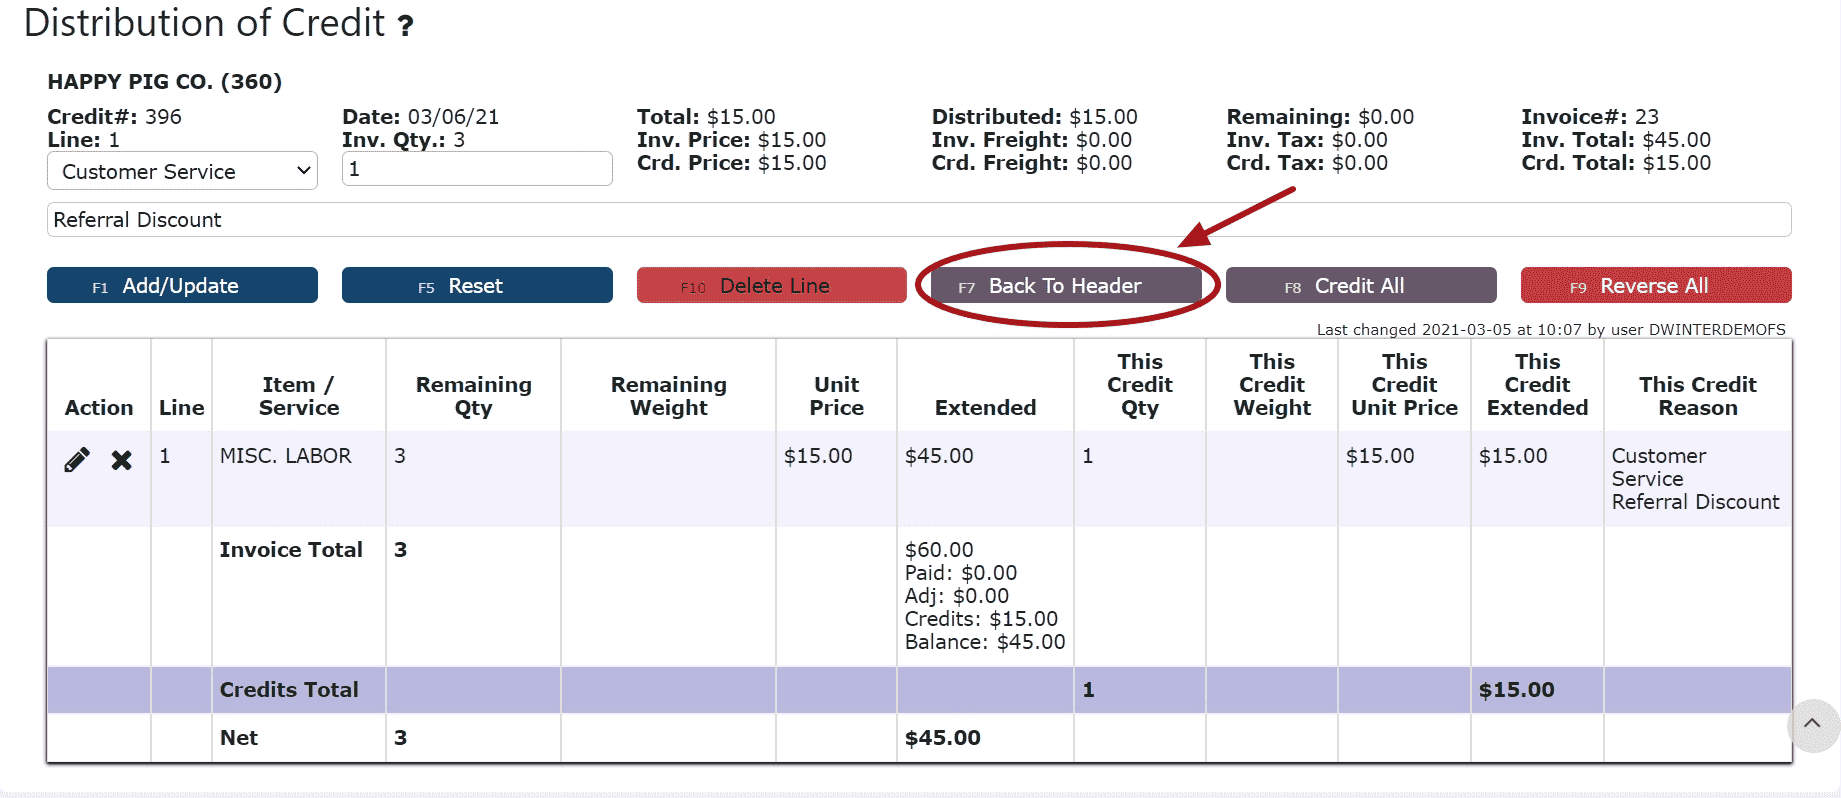 6. Make any necessary changes to the header, then click on the Close Credit Button if ready to close and post the AR Credit
 7. Click on the Post Button to post the AR CreditNote:AR Credits will only post successfully if their date matches the end of day cutoff dateAny AR Credits left open/in progress will prevent the end of day process from automatically moving forward during the night
 If Open:2. Adjust any of the header information as necessary.
 3. Click on the Distribute Credit Button to make changes to the details of the AR Credit (Against Invoice Credits Only)
 4. Make any necessary changes to the details of the AR CreditReversing a Line (Reverses the distribution made to that particular invoice):Step 1: Click on the Reverse Line Icon (X) next to the invoice/credit to reverse payment on
 Deleting a Line: (Deletes the distribution made to that particular invoice):Step 1: Click on the Edit Line Icon (Pencil)Step 2: Click on the Delete Line Button
 Reversing All Distributions (Deletes/Reverses all distributions made across all invoices):Step 1: Click on the Reverse All Button
 Editing a Line:Step 1: Click on the Edit Line Icon (Pencil)Step 2: Make Any necessary changes to the amount and/or description for that lineStep 3: Click on the Add/Update Button
 5. Click on the Back to Header Button
 6. Click on the Close Credit Button if ready to close and post the AR Credit
 7. Click on the Post Button to post the entryNote:AR Credits will only post successfully if their date matches the end of day cutoff dateAny AR Credits left open/in progress will prevent the end of day process from automatically moving forward during the night
-
Deleting an AR Credit
1. Click on the Edit Credit Icon (Pencil) next to the AR Credit to be deleted
 If Closed:2. Click on the Open Credit Button to re-open the AR Credit
For Against Invoice Credits:Note:Once deleted, an AR Credit is permanently removed and can no longer be retrieved3. Click on the Back to Header Button
4. Click on the Delete Credit Button, then click Ok on the pop up prompt
For On Account Credits:3. Click on the Delete Credit Button, then click Ok on the pop up promptNote:Once deleted, an AR Credit is permanently removed and can no longer be retrieved If Open:2. Click on the Delete Credit Button, then click Ok on the pop up promptNote:Once deleted, an AR Credit is permanently removed and can no longer be retrieved
-
Applying an On Account Credit through an AR Cash Receipt
1. Go to the Accounting Menu and click on the AR Cash Receipts Sub-Menu
 2. Click on the Add New Button
3. Enter the customer, select a payment date, payment type and enter a total payment amount
For On Account Credits Only:
Select Apply Credit as the payment type
Enter $0 for the total payment amount
For On Account Credits + Additional Payments:
Select the payment type for the additional payment(s) to be applied
Enter the amount for the total amount of the additional payments (not including the on account credits to be applied) 4. Click on the Distribute $ Button
 5. Select the credit(s) and the amount(s) to apply towards the open invoice(s)Add to Line (Selecting a partial amount of the credit):Step 1: Click on the Add to Line Icon next to the credit to applyStep 2: Enter the amount of the credit to use (must be a negative value)Step 3: Click on the Add/Update Button
 Take Full Credit Balance (applying the full amount of the credit):Step 1: Click on the Take Full Credit Balance Icon
 6. Distribute the amount of the credit(s) towards any open invoice(s) listed
Add to Line (paying a partial amount of the invoice):Step 1: Click on the Add to Line Icon next to the invoice to be paidStep 2: Enter the amount of the invoice to payStep 3: Click on the Add/Update Button Auto Pay Remaining Balance (paying the entire amount of the invoice):Step 1: Click on the Auto Pay Remaining Balance Icon
For On Account Credits + Additional Payments Only:
7. Apply the total payment amount towards any remaining open invoices using the Add to Line Icon or Auto Pay Remaining Balance Icon next to the open invoice to pay
Note: The total amount of the payment must equal the total amount distributed to open invoices in order to close the payment. The remaining amount to apply will indicate how much of the total payment is still left to distribute and will indicate $0 when all has successfully been applied. 8. Click on the Back to Header Button
 9. Click on the Close Payment ButtonNote: Once closed, the cash receipt is ready to post
 10. Review the Cash Receipt that is ready to post
 11. Click the Post ButtonNote:Cash Receipts will only post successfully if their date matches the end of day cutoff dateAny Cash Receipts left open/in progress will prevent the end of day process from automatically moving forward during the night
-
Troubleshooting Batch Errors
1. Click on the Batches Button
 2. Remove the date
 3. Locate the error batch that contains errors in red and a Re-Start This Batch Icon (Circle Arrow)Note: Any AR Batch Error that has not been resolved will prevent any transactions from posting successfully (including AR Credits)
 4. Click on the Batch Messages Icon (Lightning Bolt) next to the Error Batch in question
 5. Review the errors preventing the AR Credit(s) from posting
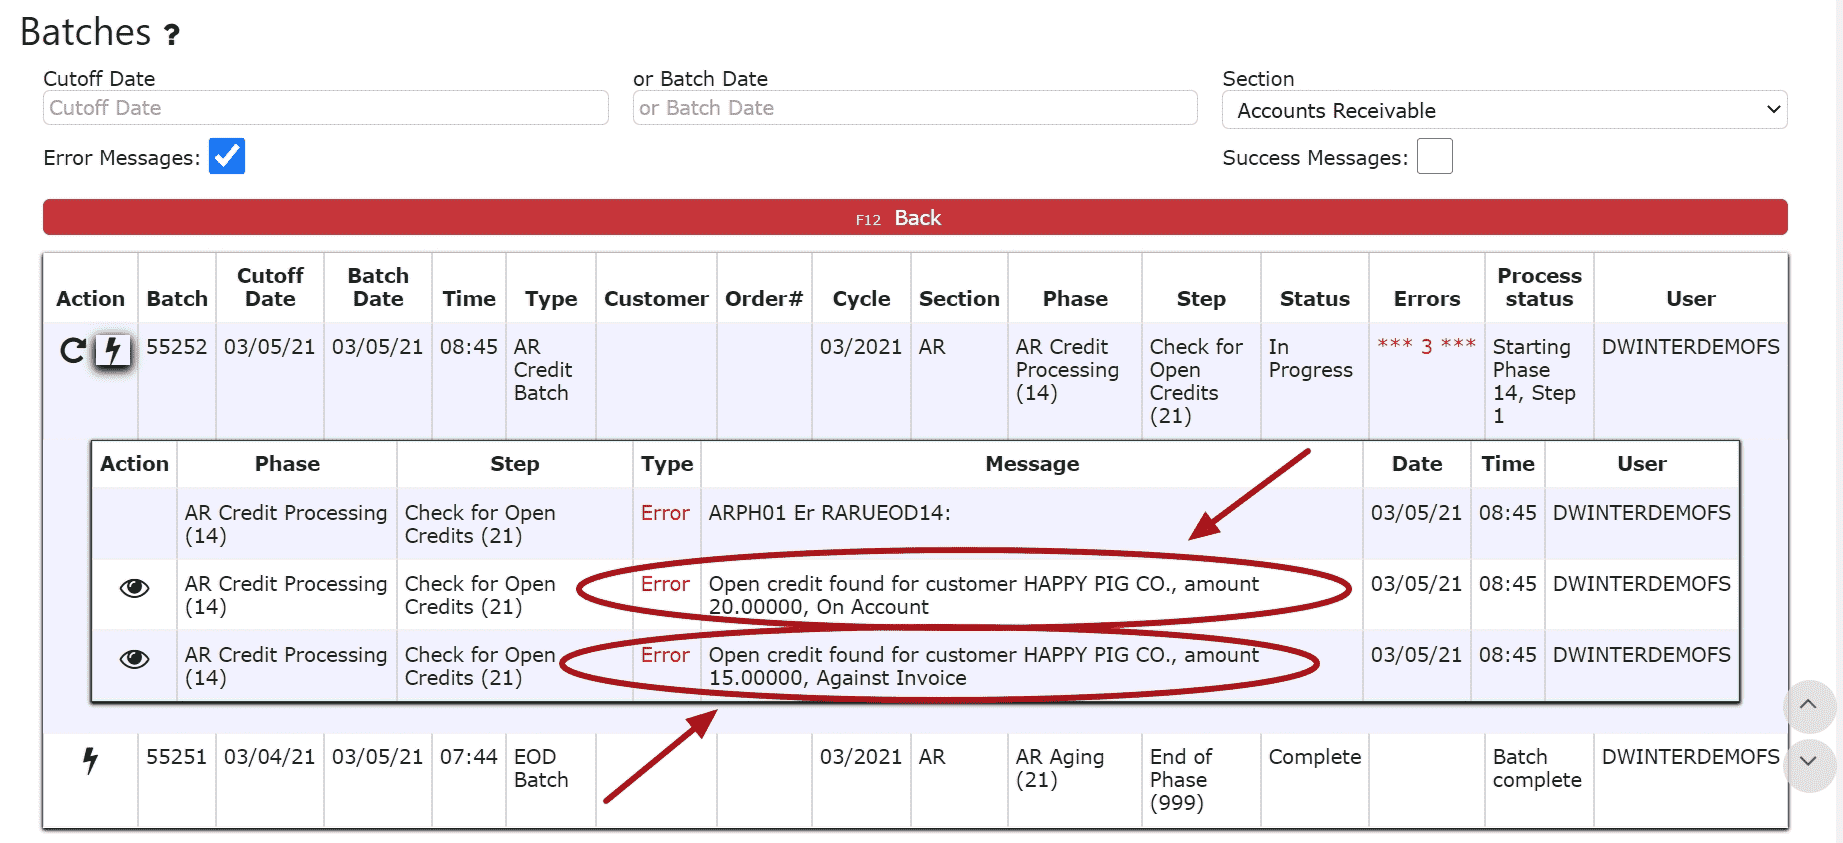 6. Resolve each error listed in the batch. Click on the eyeball next to each error to be automatically redirected to the order/transaction in question.
For Open Orders:Either invoice, cancel or forward date the order
For Open/In Progress Transactions (AR Credits, AR Misc. Cash Entries, AR Cash Receipts, AR Adjustments):Either close and post, cancel or forward date the transaction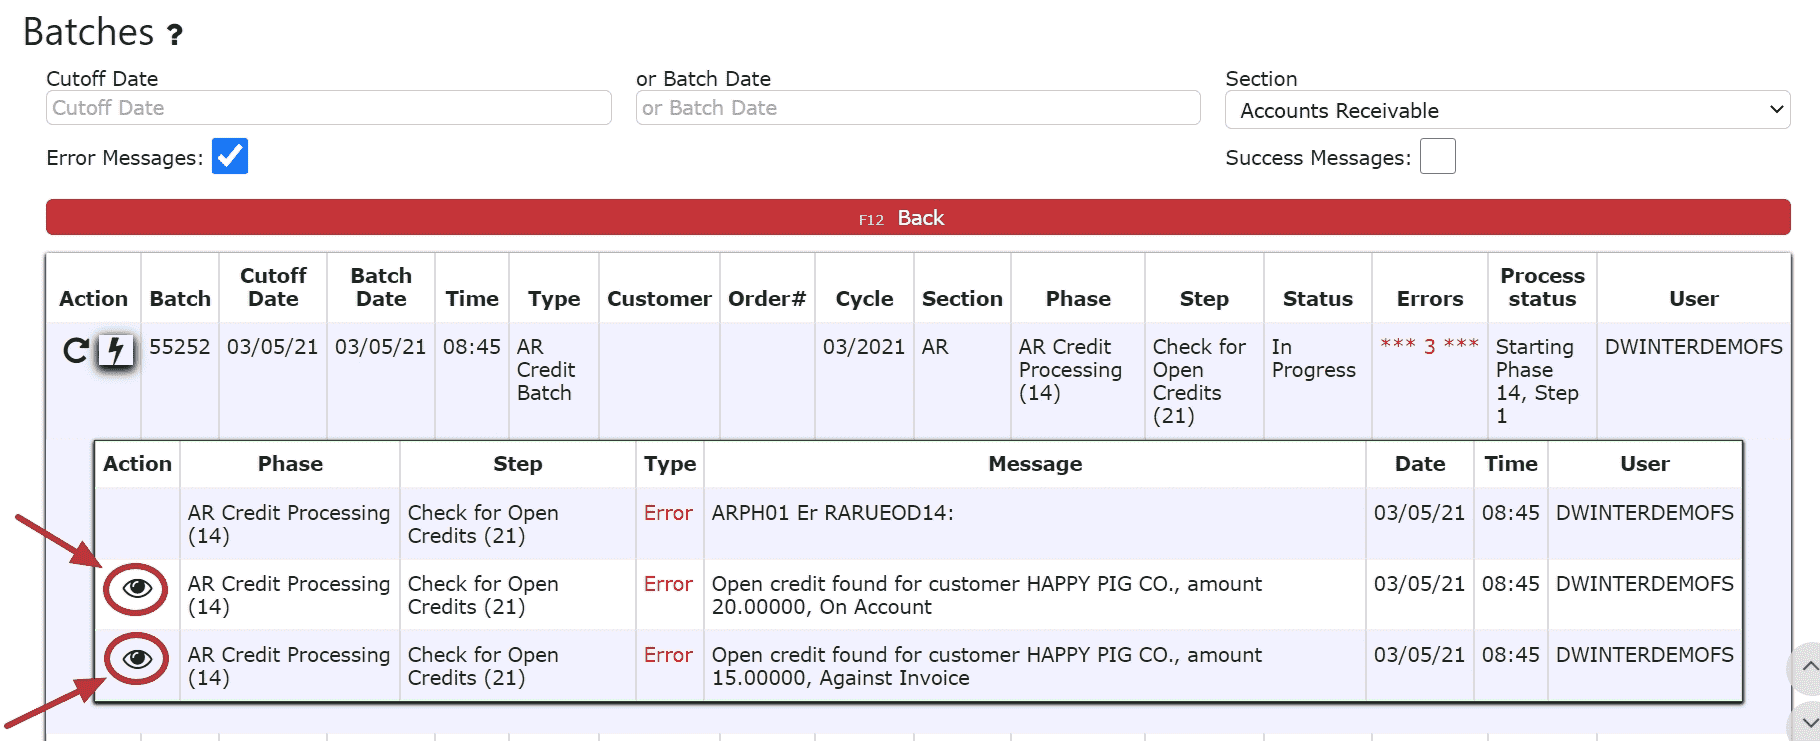 7. After all errors have been resolved, go back to AR Batches and click on the Re-Start This Batch Icon to re-start the error batch. The AR Credit(s) will automatically post, the Re-Start this Batch icon will dissapear and the red errors will turn green, if the batch is successful.
